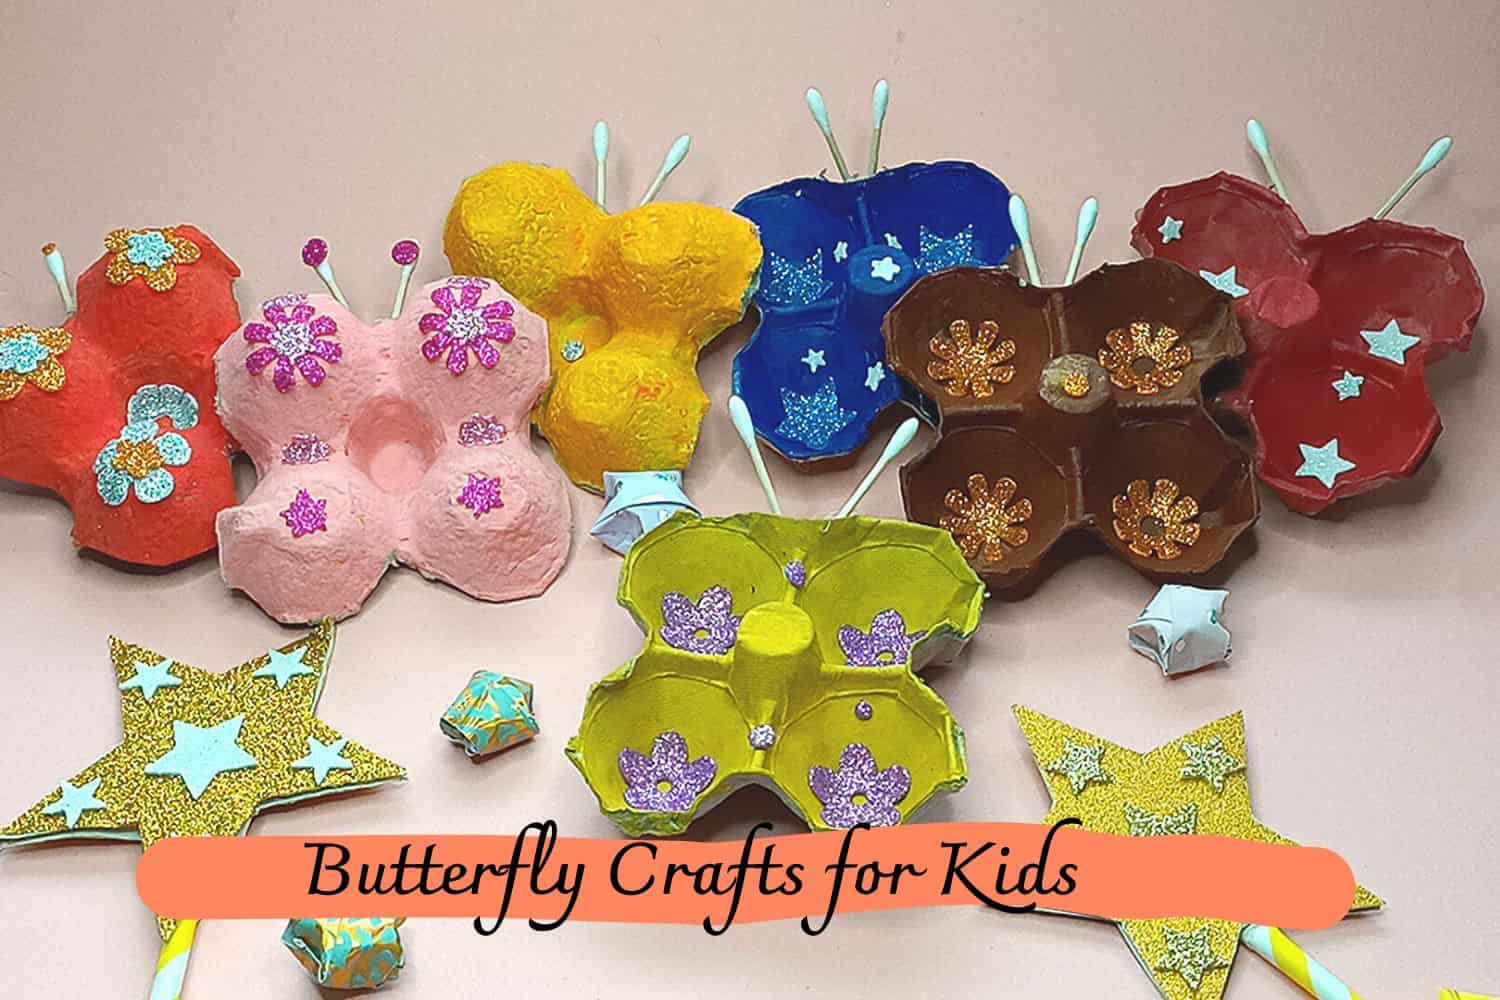
Get creative with your children this weekend! We’ve rounded up some fun butterfly crafts for kids that are sure to keep them entertained and create lasting memories.
Fun Butterfly Crafts for Kids
Are you looking for fun and creative ways to spend time with your kids that also lets them express their creativity? Then look no further than these awesome butterfly crafts for kids!
From changing up the color of wings or adding glitter and jewels, there’s something here for everyone. Whether it’s a simple homemade craft idea that takes minutes to create or an intricate decoration piece inspired by nature, each activity is sure to unleash loads of imagination and help create beautiful pieces of art.
So grab some supplies, pick one (or two) of our ideas below, and let your children’s imaginations run wild!
Butterfly Crafts for Kids Ideas
#1 Stained Glass Butterfly
Supplies:
- Contact paper
- Black construction paper
- Butterfly templates
- Tissue paper
- Scissors
- Yarn or twine
Instructions:
- Start by tracing the butterfly template onto black construction paper and cutting it out. To find a template, a quick Google search did the trick.
- Next, fold the butterfly shape in half and cut about half an inch to an inch from the outside, following the shape’s outline. This will create a stained glass frame.
- Prepare a piece of contact paper slightly larger than the butterfly. Peel off the backing and stick the stained glass frame to the sticky side.
- Cut various colors of tissue paper into small squares and place them on the contact paper, making sure to overlap slightly to cover the entire frame.
- Take another piece of contact paper, remove the backing, and carefully place it sticky side down on top of the butterfly. Trim any excess contact paper around the edges.
- Lastly, create a small hole in one of the butterfly wings, thread a piece of yarn through, and tie it in a knot. Your stained glass butterfly is now ready to be hung in the window, adding a touch of beauty to any space.
#2 Monarch Butterfly Craft
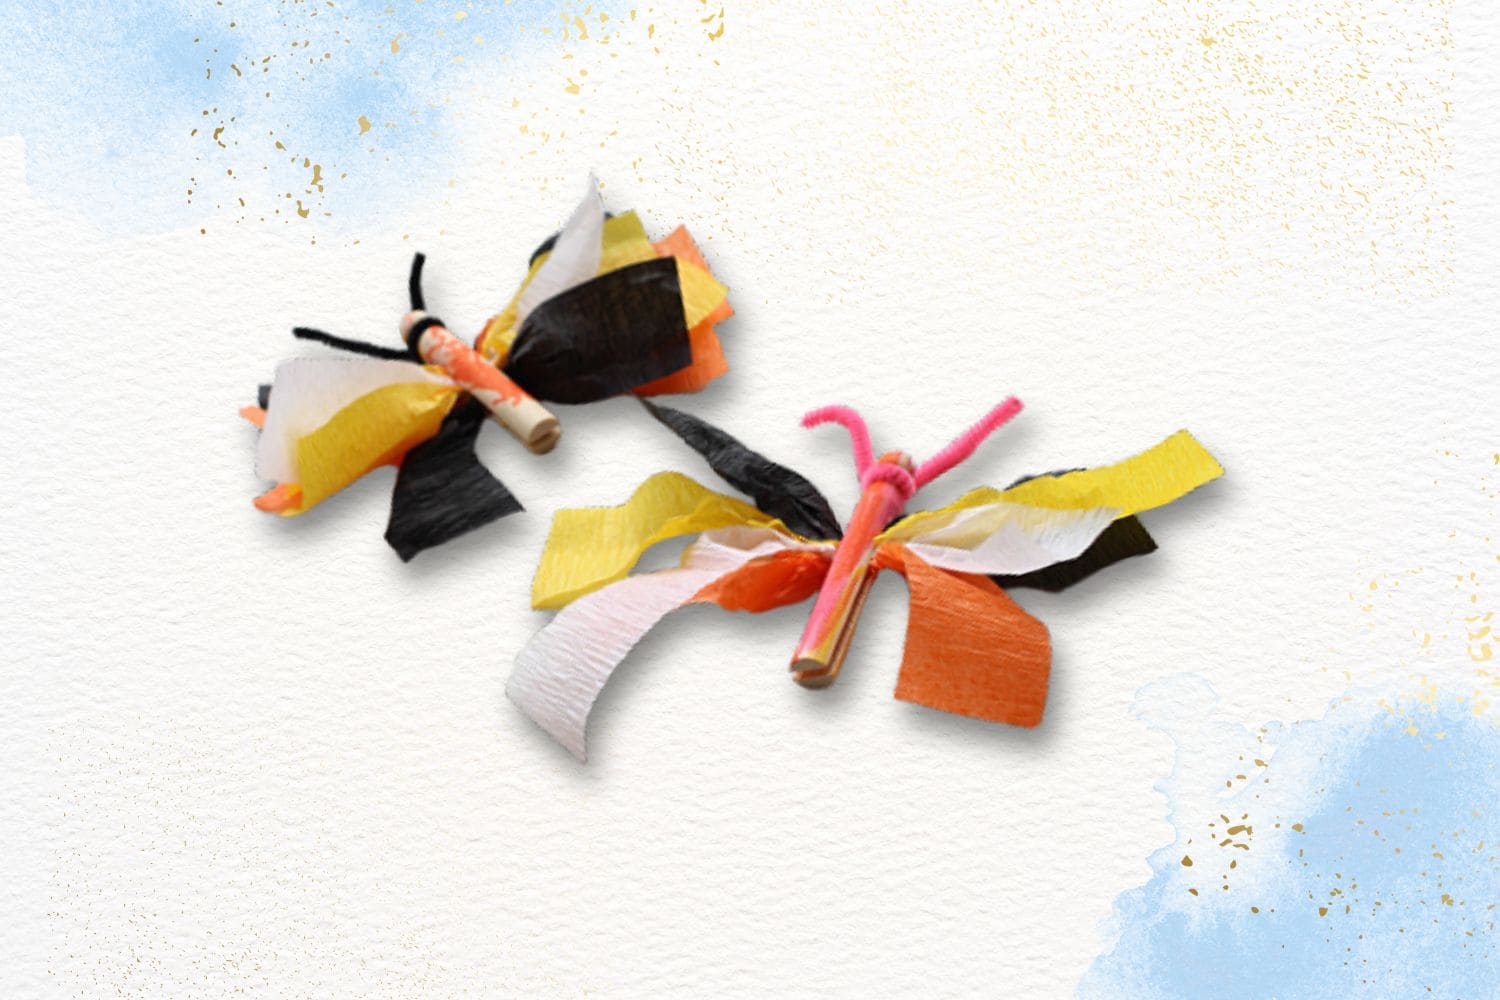
Supplies:
- Some wooden pegs
- Party streamers in orange, yellow, white, and black,
- Markers
- Scissors
- Pipe cleaners
Instructions:
- Get started by cutting your streamers for this monarch butterfly craft. You can even have your child create a pattern if they’re interested.
- Next, use markers to color your peg. My daughter and I both enjoyed this step. We used scented markers, which she couldn’t help but have a little fun with. Looks like we’ll need to replace them!
- Now, let’s insert the party streamers into the pegs. These pegs have a convenient slit that allows the paper to be carefully slid in and scrunched. It’s a great exercise in concentration.
- Time to add some pipe cleaner antennae. We went with pink for an extra touch. This butterfly craft is mess-free.
- One of the best things about this craft is that there’s no waiting time. No drying is required, no glue, no paint. You can send it home or start playing with it right away!
- Give this creative and enjoyable monarch butterfly craft a try. It’s perfect for preschoolers and kindergarteners.
#3 Bow Tie Pasta Butterfly Craft for Kids
Materials:
- Farfalle Pasta (also known as bow-tie pasta)
- Acrylic Paint
- Pipe Cleaners
- Glue
- Skewer Sticks (or craft sticks)
Instructions:
- Create adorable butterflies with this simple and engaging craft for kids. All you need is some paint and a few pieces of pasta each. Let your children unleash their creativity and paint as many pasta pieces as they desire.
- Once dry, wrap a pipe cleaner around the center and twist the top to create antennae. Use a hot glue gun to attach the butterfly to skewer sticks. The result? A colorful army of butterflies decorating your playroom.
- These fluttering butterflies offer endless play opportunities for your little ones. They can be used as shadow puppets, featured in puppet theater shows, or even turned into magical wands.
- If your children prefer not to play with them, hang them up to add a burst of color to your space. Our playroom is adorned with several beautifully crafted butterflies hanging from the ceiling.
This preschool art project is not only simple and fun, but it also keeps children engaged for a while. The best part? These butterflies provide hours of imaginative play and serve as stunning decorations for our playroom. Give this easy butterfly craft a try and watch as your children’s creativity takes flight.
#4 Butterfly Ring
Supplies:
- Paper, colored paper
- Markers, colored pencils, or crayons
- Chenille stem
- Siccor
Instructions:
- Create your butterfly craft with these easy steps. Start by cutting small squares of paper, approximately 3 inches by 3 inches, to save paper and ensure the butterflies are a manageable size for a child’s hand.
- Fold the paper in half and draw two 1/4-inch lines on the folded side. These lines will form the part of the butterfly that rests on your child’s finger, so make sure they are small enough to fit comfortably.
- Next, connect the lines and create half of a butterfly shape, such as a large B. Show older preschoolers and school-age kids how to do this themselves, resulting in unique butterfly shapes.
- Cut along the drawn lines while keeping the paper folded to create the butterfly shape. Unfold the paper and let your child decorate it with markers, colored pencils, or crayons.
- You can choose to turn some of the butterflies into rings. For this, you’ll need a chenille stem. Form a loop in the middle of the stem that fits your child’s finger, then twist the longer ends around the butterfly’s body, leaving them protruding at the top to create antennae. Put the ring on and watch your child soar around the room or outside.
- Alternatively, you can make a popsicle stick version. Gather two popsicle sticks, glue, and a chenille stem. Fold the butterfly in half and apply glue to the center part that would have been on the child’s finger. Hold it between the two craft stick ends until the glue sets and secures it. Wrap the chenille stem around the craft sticks just below the butterfly, twist it, and pull the ends through the front of the wings. Curl the ends to form the antennae.
#5 Simple Butterfly Mobile
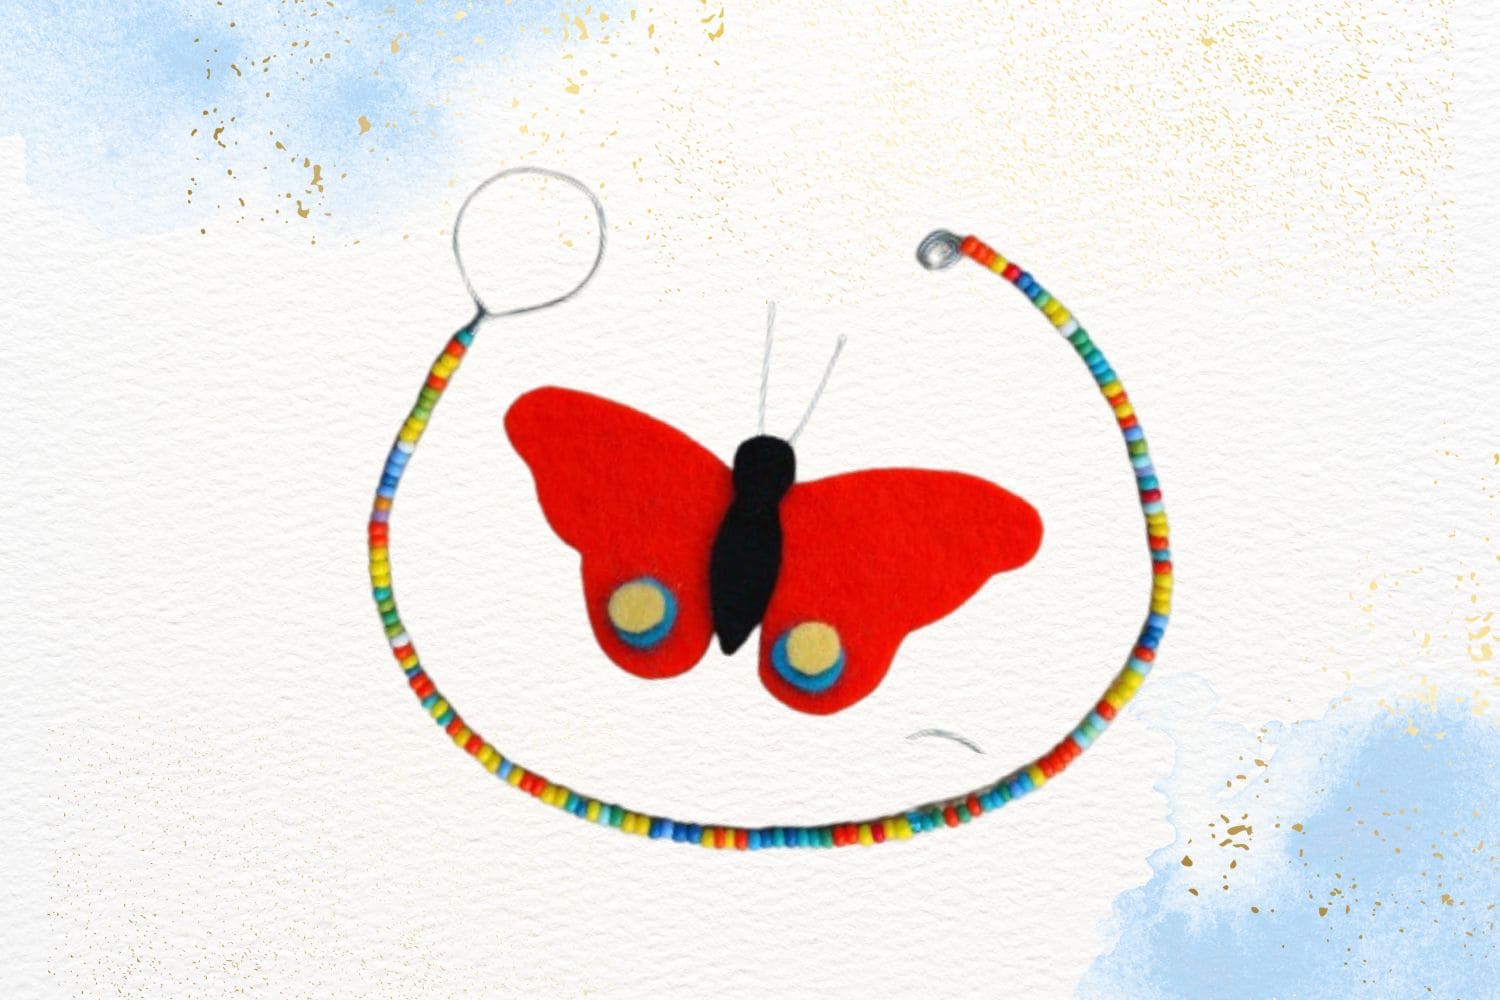
Supplies:
- Felt fabric
- Artificial flower stamen for antennas
- Beads
- 24 gauge wire
- Glue
Instructions:
- To create a stunning butterfly mobile, follow these simple steps:
- Cut out a butterfly shape, including the body and spots.
- Use glue to secure the spots in place.
- Fold a flower’s stamen in half and glue it beneath the butterfly’s body.
- Shape a wire into a spiral, then bend it at a right angle to the spiral.
- Thread beads onto the wire, leaving a 3″ tail of unbeaded wire.
- Form a circle with the 3″ tail, wrapping the end around the wire to secure it.
- Attach the wire coil underneath the butterfly.
- Your butterfly mobile is now complete!
For a personalized touch, consider having your kids color the butterfly wings on paper. Beforehand, show them pictures of real butterflies to inspire their designs. To make the body, recycle cardboard from a cereal box. Enjoy the creative process!
#6 Paper butterfly garland
Supplies:
- 2 x colored origami paper squares (15x15cm/6×6″)
- Double-sided color is recommended, but any paper will work
- Matching pipe cleaner (chenille stem) cut to 15cm/6″ length
- Twine, thin ribbon, or yarn for hanging
Instructions:
- Start by folding a piece of paper in half diagonally to create a triangle shape.
- From the center line, make zigzag folds about 1cm apart, working from one half of the triangle to the other.
- Repeat the folding process with a second piece of paper.
- Pinch the folded papers together at the center.
- Wrap a pipe cleaner firmly around the center and twist it to secure it in place. Bend the pipe cleaner to resemble the antennae.
- Open up the folded papers to create wings and flatten the edges to help them hold their shape.
- Repeat these steps to make as many butterflies as you like, using different colors for a vibrant display.
- Finally, thread twine or ribbon through the centers of the butterfly bodies to hang them up.
#7 Cupcake Liner Butterfly Clothespins Craft
Supplies:
- 2 Cupcake liners
- Clothespin
- Glue
- Glitter
- String or yarn
Instructions:
- To create an eye-catching bow tie cupcake liner decoration, begin by opening two liners. Fold each liner in half, then fold them again and secure them with glue. This will give them the appearance of a bow tie.
- Next, attach a clothespin to the cupcake liners and apply a strip of glue on top. For added flair, sprinkle a touch of elegant glitter onto the glue. If desired, attach string to the decoration to resemble antennas (note: this step may be challenging, so we only attempted it once).
With these simple steps, you can transform ordinary cupcake liners into an attractive and unique bow tie decoration.
#8 Puffy Tissue Paper Butterfly
Materials:
- White paper or cardstock
- Black marker
- White craft glue
- Tissue paper and/or crepe paper in colors of orange, white, blue, green, and yellow
- Pencil
Instructions:
- Cut 1-inch squares from tissue paper or crepe paper.
- On a white piece of paper, draw a simple butterfly shape. Use a black marker to color the body and head.
- Use the tip of a glue bottle to draw a circle of glue in the top section of each wing.
- Take an orange tissue paper square and place the eraser end of a pencil in the center. Twist the paper around the eraser.
- Using the pencil as a handle, place the tissue paper onto the glue circle and lift the pencil. The tissue paper should stand in the glue. Repeat this process with all the orange squares.
- Use light tissue paper squares to create a border around the orange circles.
- Draw two larger circles with glue at the bottom of each wing. Cover these circles with a mixture of green and blue tissue paper squares.
- Cover the remaining butterfly wings with yellow tissue paper.
#9 Clay Footprint Ring Dish Keepsake – Butterfly Design
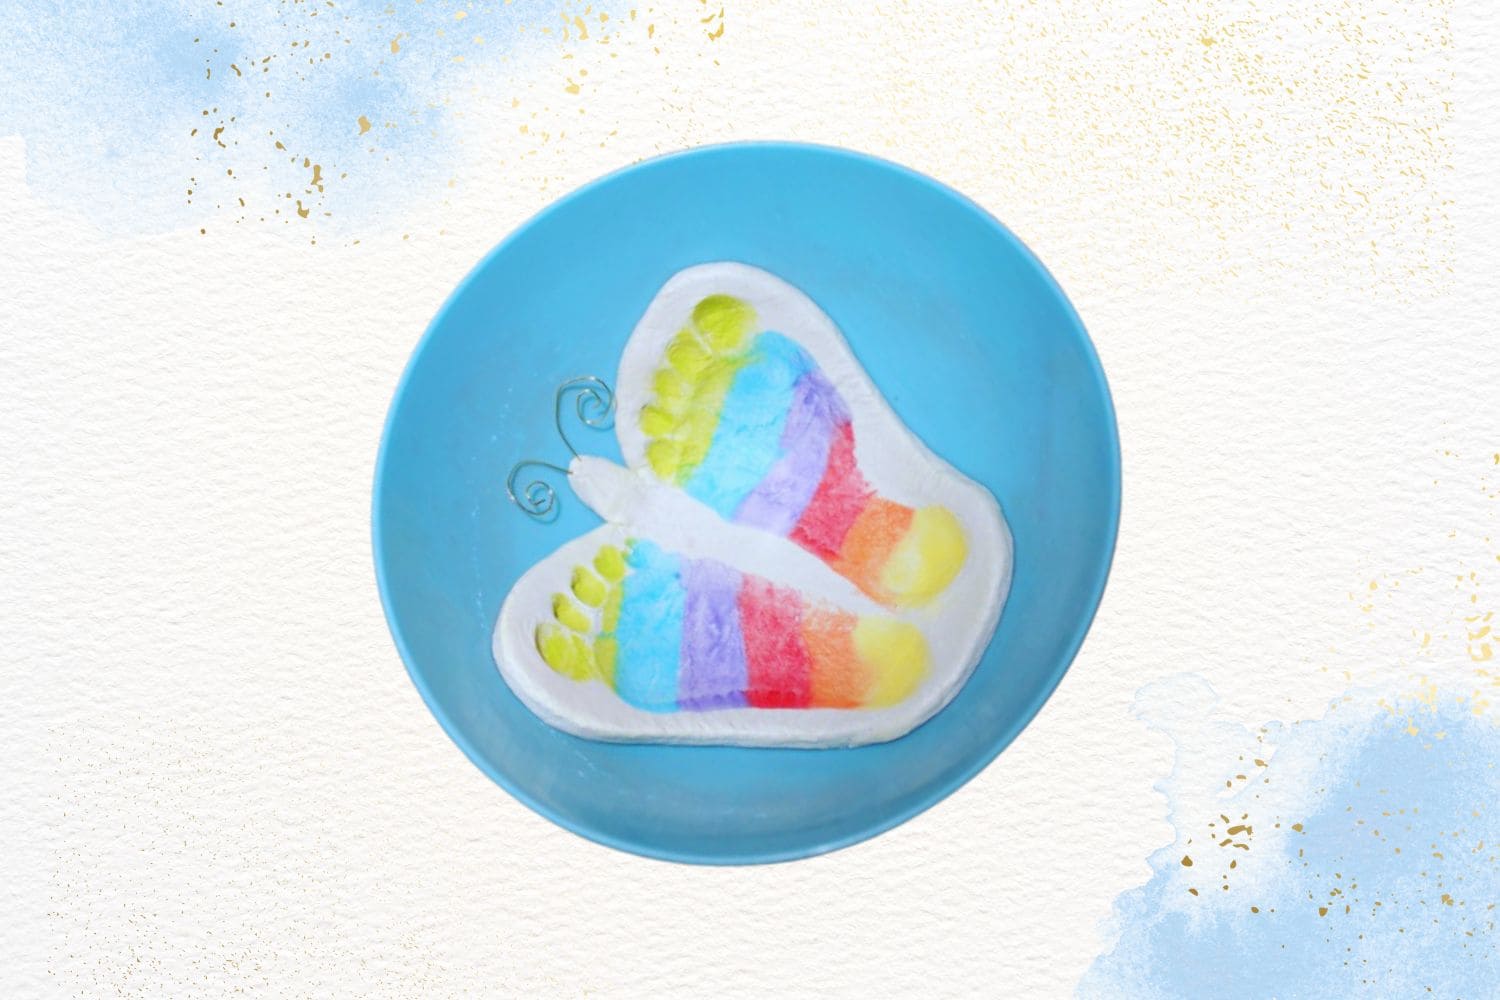
Supplies:
- Air dry clay for creative projects
- Vibrant rainbow ink pad for adding pops of color
- Shimmering gold acrylic paint for a touch of elegance
- Craft wire for versatile and intricate designs
- Rolling pin for smooth and even clay rolling
- Hard surface like a chopping board for a stable work area
- Sharp knife for precise cutting
- Small bowl for mixing and storing materials
Instructions:
Step 1: Preparing for Your Footprint Craft
Before you begin, ensure that your baby is happy, fed, and comfortable. Taking footprints while your baby is hungry or tired will only lead to frustration and smudged footprints. Have the clay, ink, and wipes within reach so you won’t have to interrupt the process.
Step 2: Rolling out the Clay
Find a hard, flat surface to work on. We recommend using an old chopping board covered with baking paper. Rolling the clay on baking paper makes it easier to handle and prevents it from sticking. Roll the clay to about 1cm thickness, ensuring there is enough space to fit 2 footprints with a small margin around the edge.
Step 3: Creating a Footprint Butterfly in Clay
There are two ways to make the footprints. You can either add color directly to the clay using an ink pad or make an imprint in the clay and paint it later. For young babies, we recommend using a rainbow ink pad, while older babies or toddlers may require a larger ink pad. Press your child’s foot firmly onto the ink pad and check the coverage before pressing it onto the clay. Position the footprints so that the outer edges of your child’s feet are next to each other with a small gap between them.
Step 4: Cutting the Clay
Take your time to carefully cut the clay around the footprints. Use a sharp knife to draw a butterfly shape, leaving a border around the edge and ensuring there is enough clay in the center for wire antennae. Once you’re satisfied with the shape, cut out the butterfly shape from the clay. Smooth out any rough edges using your fingers, and moisten your fingers with water if needed.
Step 5: Adding Antennae to Your Clay Butterfly
Cut a small amount of craft wire and curl it into a spiral shape to create the antennae. Make two antennae of similar size and shape. Carefully insert the end of the wire into the middle of the butterfly to attach the antennae.
Step 6: Shaping the Clay Butterfly into a Dish
If desired, you can transform your clay butterfly into a dish shape. Find a small bowl that can hold the butterfly. Place the clay butterfly inside the bowl, pressing it down to touch the bottom and sides. As the clay dries, it will take on the shape of the bowl. Leave the clay dish to dry for a day or two before carefully removing it. If the bottom is still damp, flip it upside down and let it dry for another day.
Step 7: Painting the Clay Footprint Ring Dish
This step is optional but can enhance the appearance of your ring dish. Carefully paint around the edge of each footprint, paying attention to each toe. Gold acrylic paint can create a beautiful effect.
Your clay footprint ring dish is now complete! This adorable butterfly-shaped dish is perfect for holding jewelry. Whether it’s a small and delicate dish made with baby footprints or a larger one made with a toddler’s feet, this homemade clay bowl will be a cherished keepsake. It also makes a thoughtful gift for grandparents or other family members. Perhaps drop a few hints to receive one as a Mother’s Day gift!
#10 Clothes Pin Butterfly Magnet Craft For Kids
Materials:
- Clothespins
- Pipe Cleaners
- Google Eyes
- Pom Poms
- Magnets
- Hot Glue
- Scissors
Instructions:
- To begin, gather a colorful assortment of 1-inch and 1.5-inch pom poms and pipe cleaners.
- Start by positioning the clothespin flat, with the clip facing up.
- Using glue, attach four 1-inch pom poms in a row, followed by one 1.5-inch pom pom for the butterfly’s head.
- For the wings, fold two pipe cleaners in half and cut at the bend.
- Take two halves of the pipe cleaners to form the top wings and secure them in shape with hot glue.
- Cut the remaining pipe cleaner halves into four equal sections.
- Use two of these sections to create the bottom wings.
- Attach the top and bottom wings to the back of the clothespin, using the metal portion as a guideline.
- To add functionality, glue a strong magnet at the top of the clothespin.
- Flip the butterfly over and add googly eyes for a touch of personality.
- Finally, create antennae by shaping the last two sections of pipe cleaners into loops and attaching them to the pom pom’s head.
#11 Sponge butterfly craft
Materials:
- Sponges (each sponge can create two butterflies)
- Pipe cleaners
- Elastic bands
- Sequins and/or plastic gems
- Glitter glue
- Craft glue (recommend using tacky craft glue for best results)
- Optional: magnet and hot glue gun
Instructions:
- Begin by cutting the kitchen sponge in half.
- Take the two halves and tie them together in the center using an elastic band.
- Use a pipe cleaner to create the butterfly’s body by twisting it around the sponge. Leave loops at the top and bottom for the antennae.
- Create curled antennae by twisting the pipe cleaner around a pencil.
- Now it’s time to get creative! Use glitter glue to make patterns such as spots and wiggly lines on the sponge. Use craft glue to attach sequins and plastic gems for added decoration.
- If desired, soak a sponge in maroon paint to create a unique butterfly.
- Attach a magnet to the back of the butterfly using hot glue for easy display.
#12 New-Sew Tulle Butterflies
Materials:
- 2 mm wire (or any wire that is easy to bend by hand and can withstand the tulle wrapping)
- Thinner, jewelry-making wire (less than 1 mm thick and highly malleable)
- Tulles in various colors
- Colored beads
- Wire cutter and scissors
Instructions:
- Create uniform wings by wrapping thick wire around a pot, using it as a template. Secure the ends and trim as needed.
- Repeat this process three more times to obtain two sets of wings, totaling four wire loops.
- Enhance the appearance of each loop by wrapping the tulle tightly around them, and securing it with thin wire. Be sure to pull and twist the tulle for neater wings.
- Stack all four loops on top of each other and secure them together using a thin wire. Instead of securing two loops at a time, it is more efficient to secure all four loops together, conserving wire.
- Remove any excess tulle by trimming it off.
- Open the loops to reveal a gorgeous butterfly shape.
- Insert beads into the butterfly using the thicker wire. The number of beads will depend on the desired size.
- Wrap the thicker wire around the middle of the butterfly and twist the ends to secure it in place. Create antennas by twisting the tip of the wire.
#13 Butterfly Pop-Up Cards
Materials:
- A5 card
- Black paper (21cm long and 6cm high) or white paper that can be decorated with pens
- Orange paper for decoration
- Scraps for additional decorating (e.g. blades of grass)
- White paint and a toothpick for monarch butterfly wing details
- Scissors
- Glue stick
Note: If you don’t have black paper, you can use white paper and still create a beautiful butterfly card. The black paper was used for a pop-up monarch butterfly effect.
Instructions:
- Concertina Paper Chain: Begin by folding your white paper in neat 3.5cm folds. Make sure each edge aligns perfectly for a professional finish.
- Cutting the Butterfly: Draw half of a butterfly, ensuring that the tip of the wing is on the side that “flaps open.” The butterfly should reach the edge, creating a strong connection between the butterflies. You can use a straight edge as a guide to keep everything intact. Remember, the center of the butterfly should be on the closed side. You can create a butterfly template or use one you find online to make the process even easier.
- Decorating Your Butterflies: Now comes the fun part – decorating your butterflies! Get creative and add your personal touch. For example, I turned my butterflies into monarch butterflies by adding orange paper and paint for white dots. You can experiment with different colors and designs. Make sure to cut out 5 more shapes to keep the butterflies symmetrical.
- Adding Additional Details: To enhance the overall look of your card, you can also decorate the background. Cut thin triangles to resemble blades of grass and stick them down. This will add depth and make your butterflies stand out even more.
- Assembling Your Pop-Up Butterfly Card: Finally, it’s time to assemble everything. Apply glue to the back of the two “outside butterfly” halves and carefully stick them onto your card. Make sure they align properly for a flawless finish.
Once you’ve completed these steps, your pop-up butterfly card is ready to impress! You can write heartfelt messages for occasions like birthdays or Mother’s Day. And don’t be afraid to go the extra mile and add flowers or a sky with clouds for an even more enchanting touch. Let your imagination run wild!
Conclusion
Crafting provides a fun, educational, and creative outlet for kids to express themselves, and creating butterfly crafts is an excellent way to give your children a great project that encourages their imagination.
Not only are there a variety of crafts available that feature these impressive insects, but the materials used to make them are usually easy to find and inexpensive. This activity can help teach them more about science while also introducing them to art forms like drawing and paper-scissoring.
Plus, they’ll have a beautiful piece of artwork to enjoy or give as a gift at the end of it all! A morning spent making butterfly crafts with your little ones will end up being not only enjoyable for everyone involved but also productive in terms of the learning experience.
Thanks for reading our article Butterfly Crafts for Kids. If you want to know more information, visit our website here.
Read more: