Spice up your kids’ playroom with this fun DIY project! Learn how to make a toy kitchen out of wood with these step-by-step instructions.
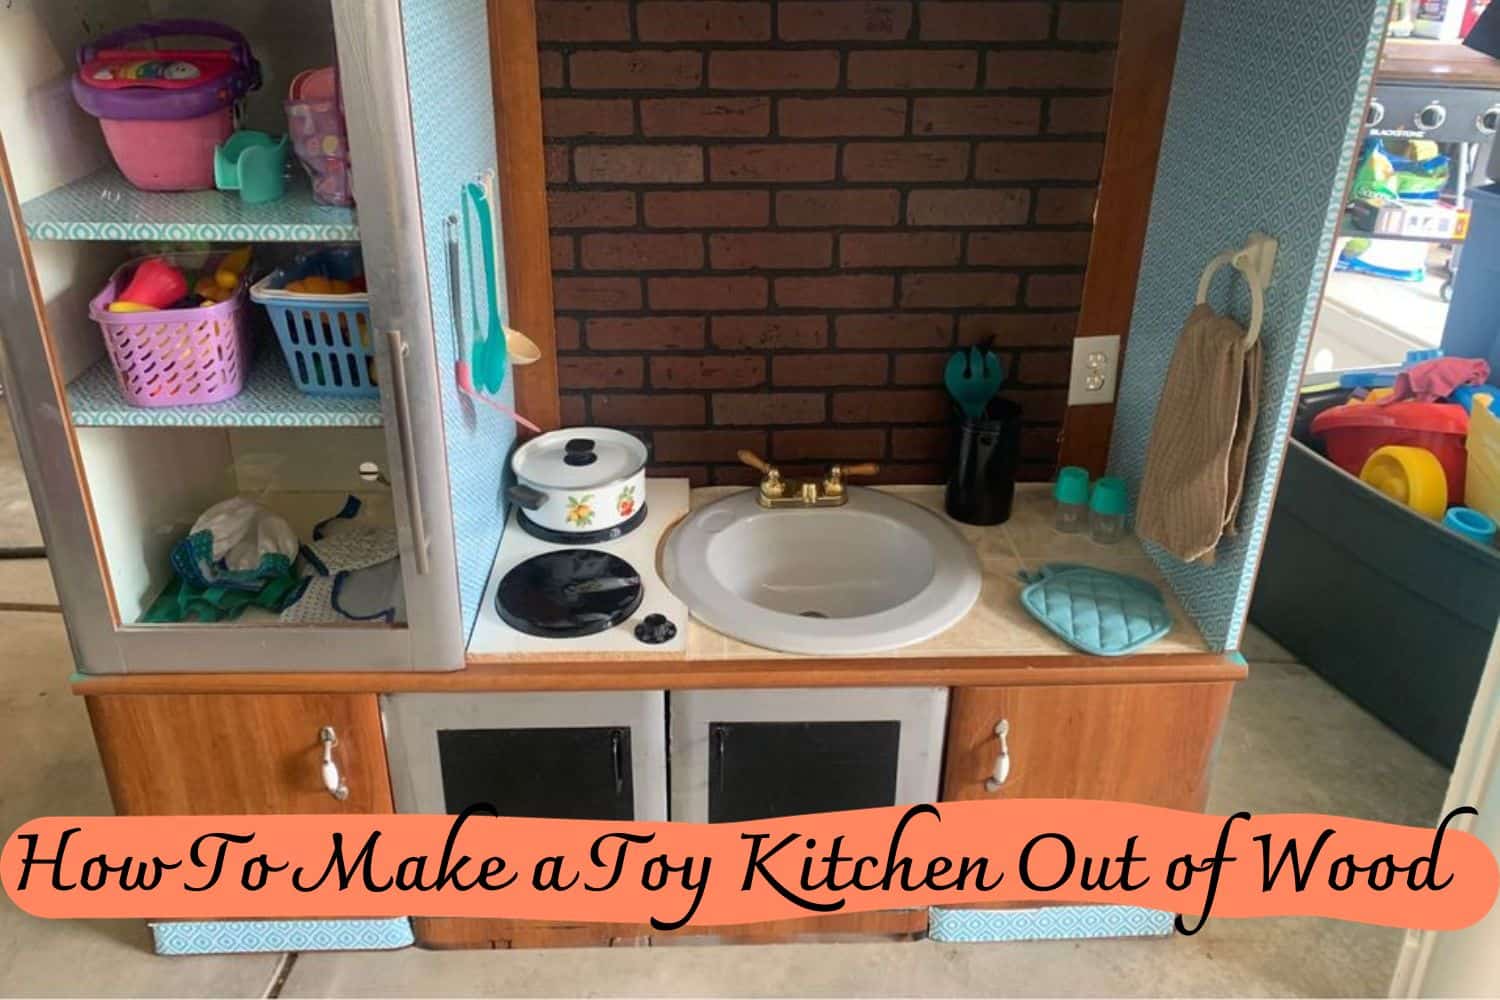
How To Make a Toy Kitchen Out of Wood
Are you looking for a fun and creative way to keep your little one entertained? Why not build your toy kitchen out of wood? It might seem daunting at first, but it is quite easy and fun when you get the hang of it.
With nothing more than some basic tools (which you likely already have!) and a few materials from the hardware store, you can make an amazing wooden toy kitchen that will provide hours of imaginative playtime.
Plus, with a homemade touch like this, it’ll be something special that will bring joy to both parent and child alike! Let’s take a look at how to make a toy kitchen out of wood!
Why Choose Wood?
While there are many toy kitchens available on the market, making your own out of wood has some distinct advantages. For one, it can be customized to your child’s taste and style – you can choose the color, size, and design that best suits them. Additionally, wood is a durable and long-lasting material that will withstand years of playtime.
How To Make a Toy Kitchen Out of Wood
#1 Easy and Simple
Step 1: Start by purchasing a small pine end table to serve as the foundation for your play kitchen. Build everything around this key piece.
Step 2: Get a small stainless steel dog dish from the dollar store and use it as the sink for the kitchen. Trace the dish onto the surface and cut out a hole for the “sink”.
Step 3: Cut a small piece of plywood to attach to the back of the kitchen. This will serve as the back of the stove.
Step 4: Attach a small piece of plywood down the center of the table to allow for two doors and replicate cabinets. Get creative with paint to replicate quartz counters and use a small can of dark brown paint for the rest.
Step 5: Add plastic pipes for the faucet and paint wooden drawer knobs for the oven and sink controls. Attach two cupboard doors using plywood and simple door hinges. Use “stainless-steel-like” shelving paper for the oven top, oven backing, and door. Hand-draw oven burners with a permanent black marker. Install a brushed chrome knob for the cupboard door and a brushed chrome handle for the oven door.
Step 6: Make the play kitchen match your kitchen by using a leftover piece of maple as the backing. Add a shelf and apply peel-and-stick subway tiles for the finishing touch.
Step 7: Place a battery-operated light under the counter and paint a digital clock.
Step 8: Complete the look of the kitchen by purchasing some simple pieces such as pots and pans, tin cans, and play food from the dollar store.
#2 Complete and Convenient
Materials:
5/8″ and 1/2″ plywood for the structure
2″ dowel rod
3 door handles
1×3″ board for shelves
6 small door hinges for smooth opening and closing
5/8″ edge banding
Wood stain
3 wooden knobs for stove controls
3/4″ drain pipe for a fun sink
8×8 nonstick cake pan
Plastic/plexiglass
1 small knob for oven temperature control
Wood glue and gorilla glue for strong adhesion
White paint
Black spray paint
Tools:
- Miter saw for precise cuts
- Nail gun for secure assembly
- Circular saw for shaping the plywood
- Drill press for creating holes
- Jig saw for intricate cuts
- Kreg jig for pocket hole joinery
Instruction:
- To create your custom kitchen cabinet, follow these step-by-step instructions:
- Start by sketching a simple outline of the cabinet design, with dimensions that suit your space. For example, you can choose dimensions of 36″ high and 48″ wide, divided equally into sections for the fridge, stove, and sink (each 16″ wide).
- Use a sheet of 5/8″ wide plywood measuring 4’x 8′. With your sketch as a guide, cut the plywood into three equal strips using a circular saw. Each strip should be just under 16″ wide. Then, use a miter saw to cut each strip into the required lengths.
- Assemble the frame of each section using Kreg jigs to connect the pieces. Add wood glue and clamps in some areas for extra stability.
- Attach 1/4″ thick plywood to the back of each frame using a nail gun to create the backing.
- Cut down a scrap 1×3 and attach it underneath the “countertop” in the sink and oven sections using a Kreg jig. This will provide a space for attaching oven knobs and visually complete the sink area.
- Cut shelves to size and attach them to each section using a nail gun. Make sure to leave space at the front edge of the shelves to accommodate the width of the doors, resulting in inset (flush) doors.
- After positioning all the shelves, proceed to the legs. Purchase a 2″ diameter dowel rod and cut it into four 4″ long pieces. Measure the center of each rod and use a drill press to predrill a hole in each one.
- Mark the placement of each leg and predrill a hole in each marked spot.
- To ensure stability, attach the legs using 3″ screws. This will provide a secure hold.
- For the doors, use a 1/2″ sheet of plywood to cut the required sizes. Since attaching hinges directly to the width of the plywood can be challenging, cut a piece of scrap wood and screw a small block onto the door to serve as an attachment point. Alternatively, use a wider board for the door to skip this extra step.
- Once the frame, shelves, legs, and doors are in place, begin by applying Kilz primer to the doors. Afterward, paint two coats of Sherwin Williams Dot to Dot in Satin. If available, repurpose leftover paint from a previous project.
- Next, apply edge banding to all the front-facing plywood boards. While plywood is lightweight and cost-effective, it may not have the desired appearance. Purchase 5/8″ edge banding that comes with an adhesive on the back, activated by heat. Set the iron to the “cotton” setting and place the edge banding against the side of the plywood, running the iron over it to activate the glue. Work on sections of about 4-6 inches, moving the iron back and forth over each section for approximately 20 seconds. This process may be slower but will significantly improve the look of the plywood.
- The edge banding is paintable and stainable, allowing it to match the rest of the plywood. Test out different stains, and once decided, apply the chosen stain accordingly.
- Spray paint the wooden knobs and attach three of them to the front of the oven. Measure and drill three holes in the front to accommodate the knobs. Enjoy the finished look!
- To create the appearance of an oven, make a 10″ x 7.5″ rounded template on a piece of paper and trace it on the back of the oven door. Use a jigsaw to cut out the traced hole, then sand down the edges.
- Begin by cutting two pieces of plastic measuring 12″ x 9.5″. It is recommended to test a small piece first to get the hang of cutting without chipping the edges.
- Spray paint one-piece black, leaving the other piece clear. Start by gluing the black piece down using Gorilla Glue, ensuring the spray-painted side faces away from the oven door hole. Then, glue the clear piece on top of the spray-painted side to protect the paint during playtime.
- Next, prepare the burners. Cut a long piece of scrap shiplap into 16 strips, each just under 3 inches long. Spray paint each strip black and let them dry. Apply a thin line of wood glue to the back of each strip and arrange them in an asterisk pattern to create the burners.
- For the sink area, use an 8×8 cake pan from Target or a similar item. Trace the outline of the cake pan on the countertop. Cut out the hole using a jigsaw, ensuring a perfect fit for the cake pan.
- To create the faucet, use a 3/4″ drain pipe tube. One end is already formed like a faucet. Use painter’s tape to mark where to cut the hose and make a clean cut with a utility knife. Mark the desired location for the faucet and use a 1″ drill bit to create a hole.
- Cut the tube to length so that approximately 2 inches stick out in the bottom sink cabinet. Then, splice the part that will be under the counter into four pieces. Screw each spliced section into the bottom cabinet to securely hold the faucet in place. Use a small piece of scrap wood inside the tube to maintain its upright shape.
- Place a scrap piece of wood under the spliced sections to prevent the faucet from being pushed down into the hole.
- Spray paint the gold knob black. Drill through the tube and the wood inside, then screw the knob in place to serve as the faucet handle.
Conclusion
This project may seem complicated at first, but it’s quite rewarding and fun. Creating something from scratch will bring a lot of satisfaction, so why not go ahead and give it a try?
Plus, having your homemade toy kitchen means you’ll be able to spend quality time with your kids and let their imaginations run wild.
Not to mention, the feeling of accomplishment that comes with being able to build something from simple ingredients like wood, nails, and screws is priceless.
Ultimately, making a toy kitchen out of wood is an achievable task if you make sure to follow these guidelines every step of the way.
Invest some time in proper preparation before getting started, read up on reliable woodworking techniques, measure twice and cut once for greater accuracy, and always remember safety first. Let’s start achieving those DIY dreams together!
Thanks for reading our article How To Make a Toy Kitchen Out of Wood. If you want to know more information, visit our website here.
Read more: