Unlock the secrets of the cube with this step-by-step tutorial on how to play the Rubik 3×3. Suitable for beginners and experts alike, you’ll be a master in no time!
How to Play the Rubik 3X3 Easily | Step-By-Step Guide
Are you an enthusiast of challenging puzzles? Have you ever tried your hand at solving a Rubik’s 3×3 Cube puzzle, but failed? If yes, don’t despair! Here we will give step-by-step instructions on how to play the Rubik 3×3.
It is a cube puzzle that requires logical thinking for its solution. This engaging challenge will not only test your problem-solving abilities but also reward you with vibrant terrific colors when solved correctly.
So be prepared for an unbeatable level of excitement as we take the journey together into mastering this brain teaser.
Overview of the Rubik 3×3 Cube
The Rubik’s Cube was invented in 1974 by Hungarian sculptor and professor of architecture, Ernő Rubik. Since then, it has become one of the most iconic and popular toys in the world, challenging minds of all ages with its complex design and countless combinations.
The Rubik 3×3 is the most common and well-known type of Rubik’s Cube, consisting of six different colored sides with nine smaller cubes on each side. The goal is to twist and turn the cube until each side has only one color.
The Basics of Solving a Rubik’s Cube
1, Colors
The Rubik’s cube consists of six sides, each representing a different color: white, yellow, blue, green, orange, and red.
2, Pieces
There are three types of pieces on the Rubik’s cube:
Centers: These pieces remain fixed and act as a reference point for solving the puzzle. In a solved cube, all the pieces of a particular color surround the center of that color. In a scrambled cube, the center represents the side where the pieces of a particular color should be.
Corners: As the name suggests, the corner pieces are located on the corners of the cube. Each corner piece is made up of three different colors. There are eight corners on the Rubik’s cube.
Edges: The edges are the pieces located between two corners. Each edge piece is made up of two colors. There are twelve edges on the Rubik’s cube.
How to Play the Rubik 3X3?
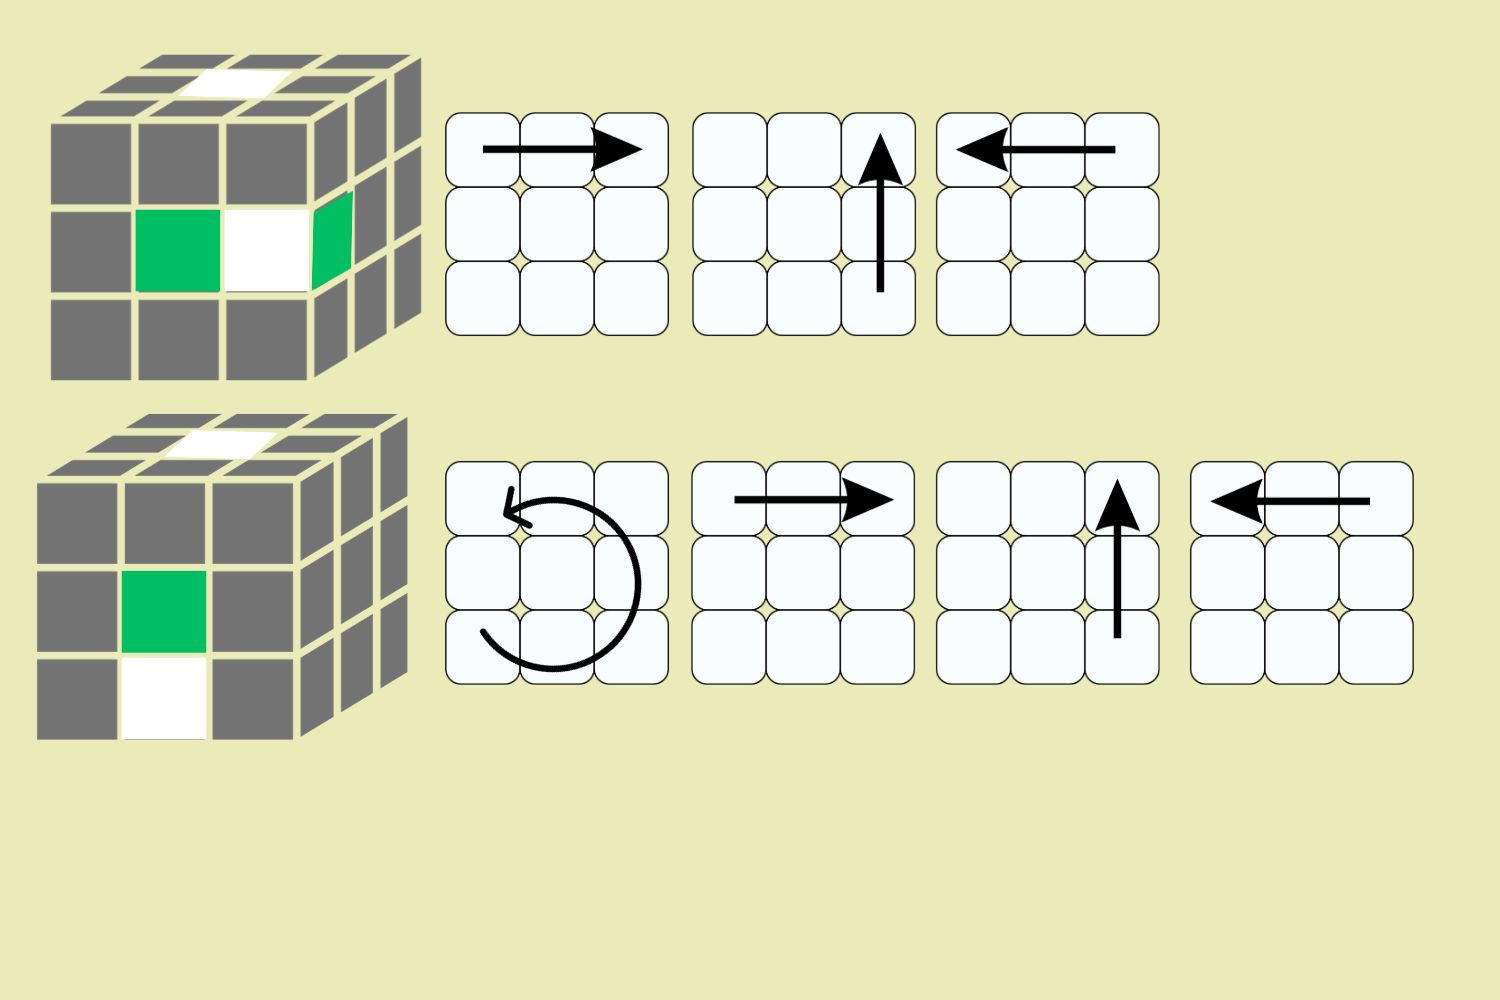
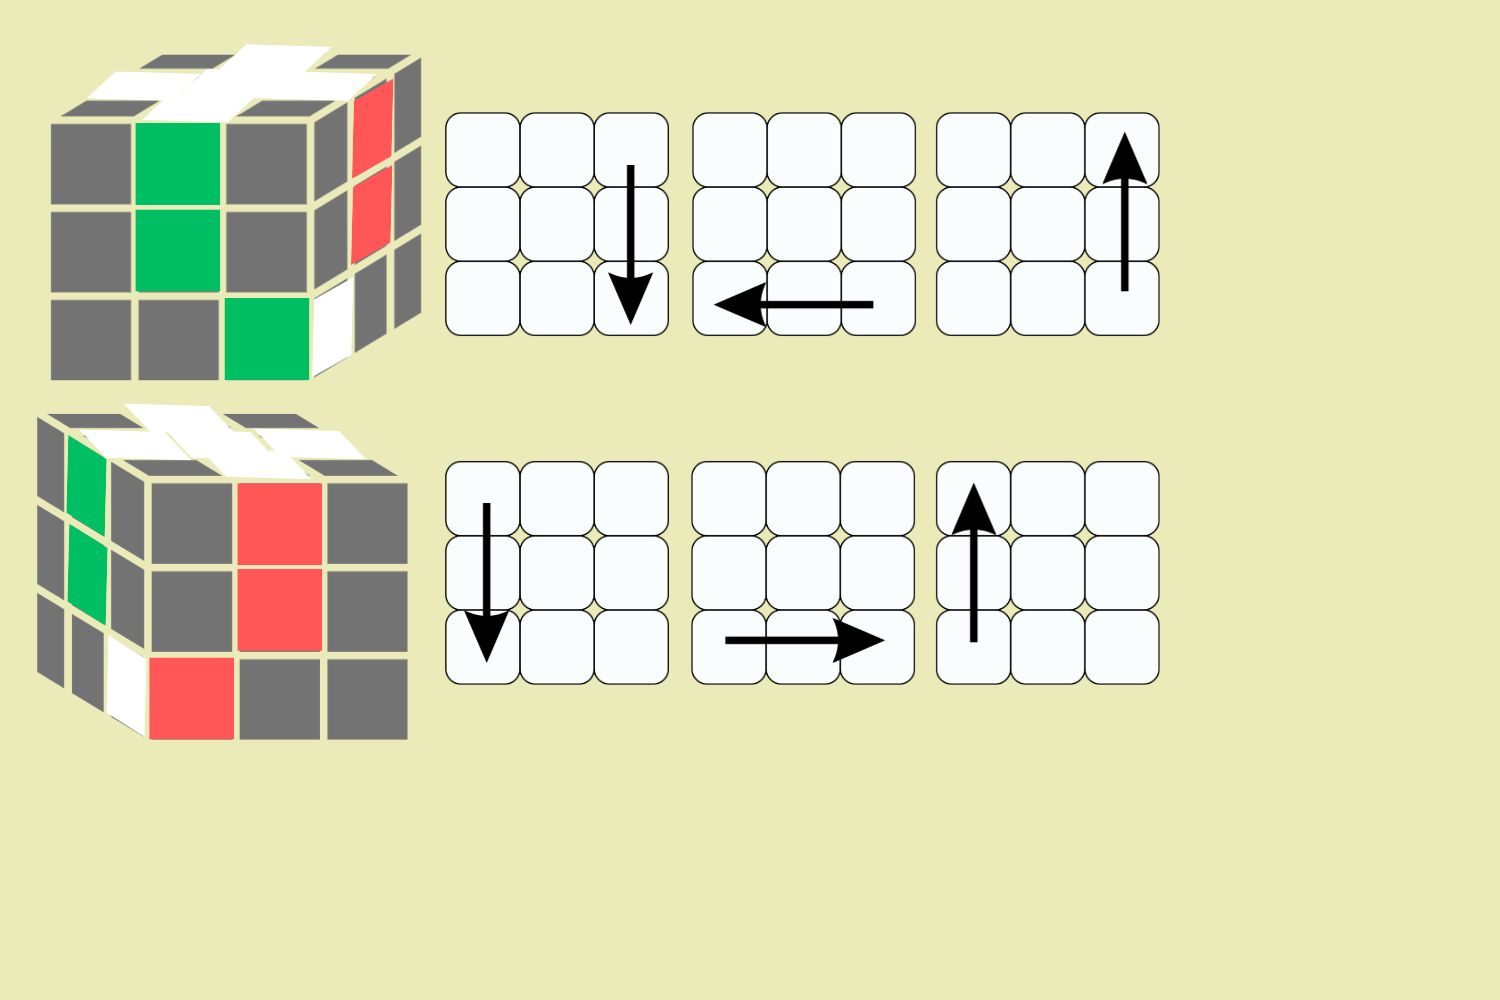
Step 1: Completing the First Layer of Cross
- Keep the white center on top.
- Place the green centerpiece in front, facing you.
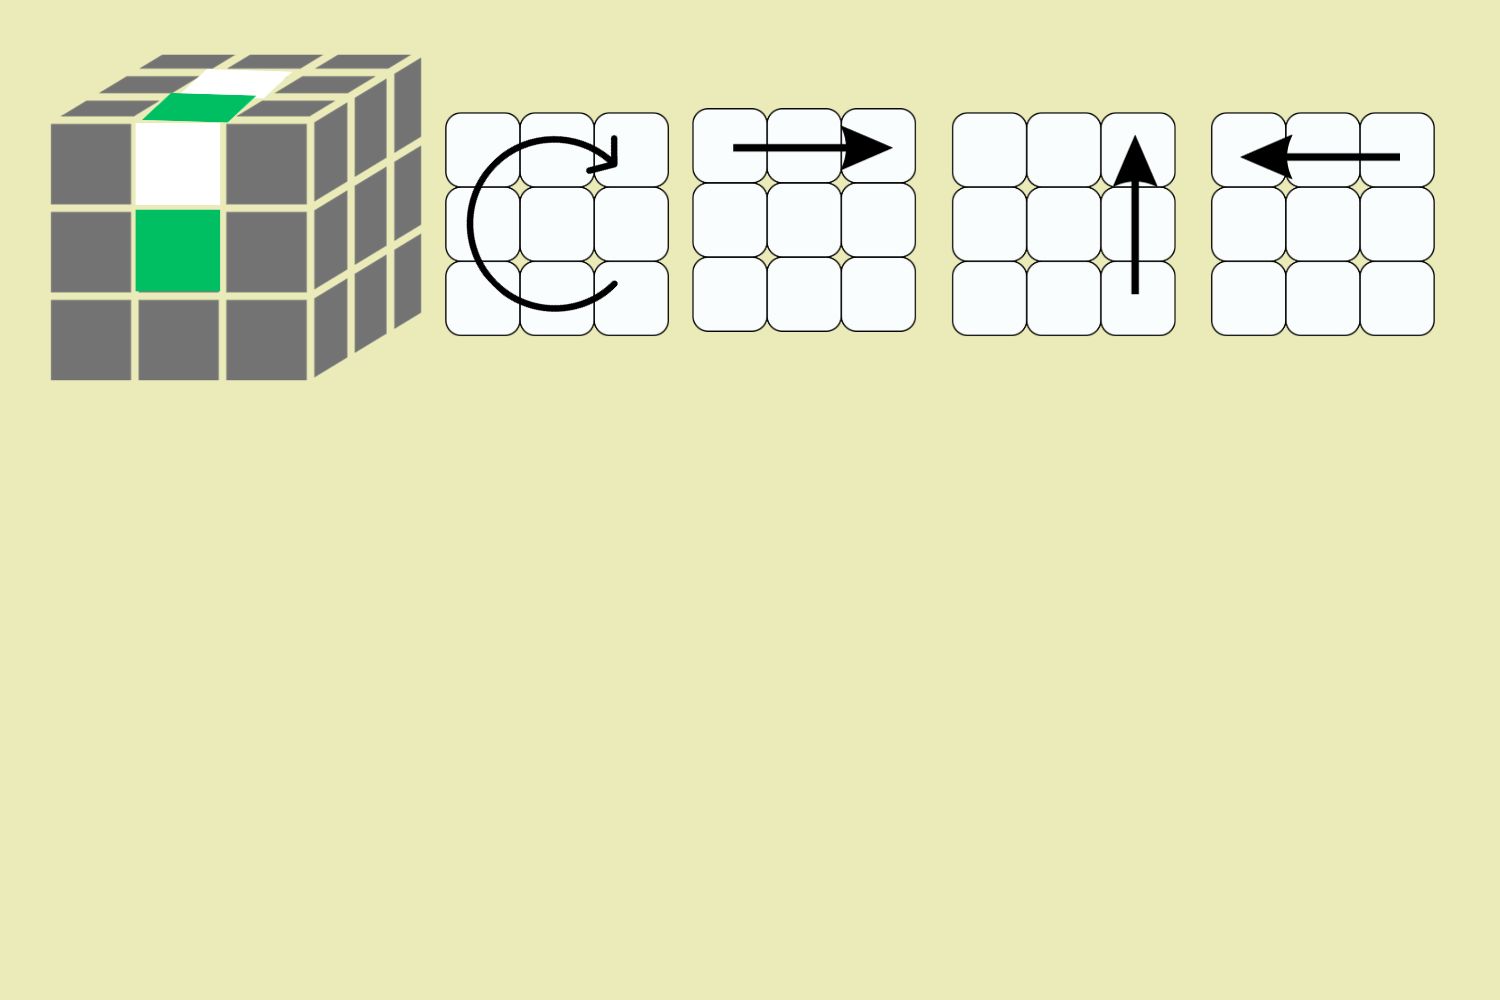
- Locate the green/white edge piece (with only two colors) and turn it to one of the positions shown below, while keeping white on top and green in front.
- Choose the option that matches your situation and follow the arrow steps to correctly place the green/white edge piece.
- Continue to complete the white cross by repeating these steps for the remaining faces. Ensure that the white edges are placed correctly without disturbing the ones already fixed.

Solving the white cross:
Keep the white on top and rotate the cube so that a different colored face (center) is facing you.
Follow the instructions mentioned above.
Repeat the process for the other two faces until the white cross is fully formed. This step may require practice but it is intuitive. Focus on moving the white edges to their designated spots without disrupting the ones that are already in place.
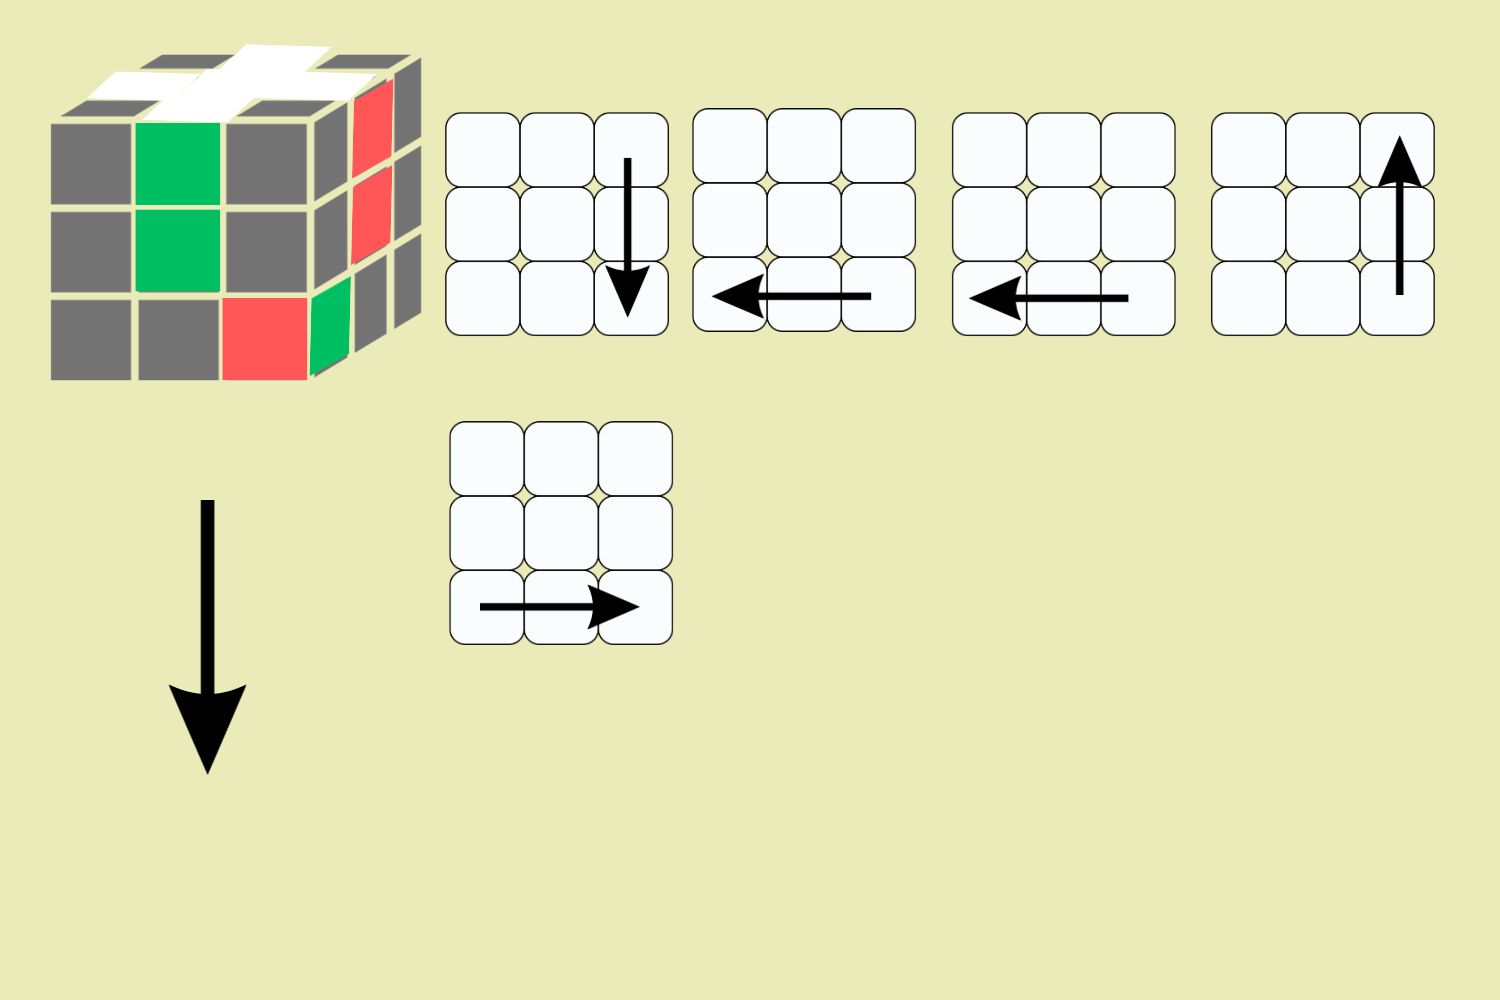
Step 2 – Complete The First Layer of Corners
- Keep the white side facing up.
- Place the green centerpiece in front, facing you.
- Look for the corner with green, white, and red colors.
- Without disturbing the white cross, position the corner in one of the designated spots below.
- Follow the steps below to correctly place the green, white, and red corner pieces.
Possible Problem:
The corner you need is in the top layer but in the wrong position or orientation.
- Rotate the cube so that the corner is in the front right top corner.
- Move the corner to the bottom layer by following the steps below.
Solution:
- Complete the steps provided above.
- Rotate the cube again to have a different-colored face facing you.
- Repeat the instructions.
- Repeat for the remaining faces until the white cross is fully formed.
Note:
Please refer back to the original steps after completing the above instructions.
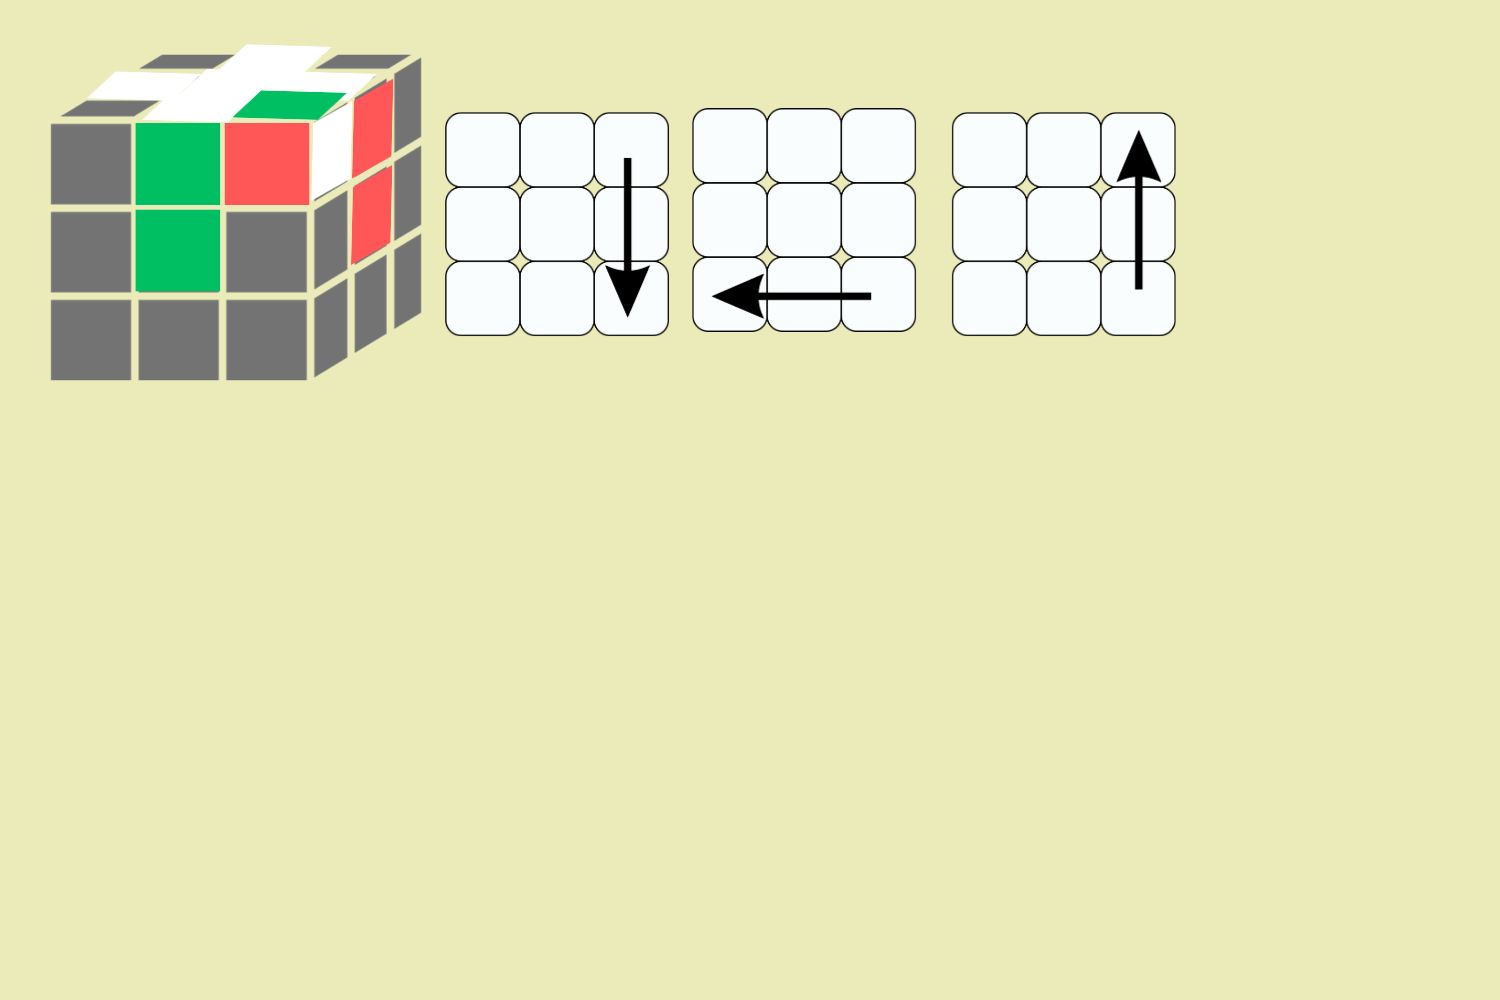
Step 3: Complete Second Layer – Ensure White Remains On Top
- Locate the edge piece with a combination of green and red colors.
- If the edge piece is in the bottom layer, align the bottom layer to match the edge with the center color (refer to the figure below).
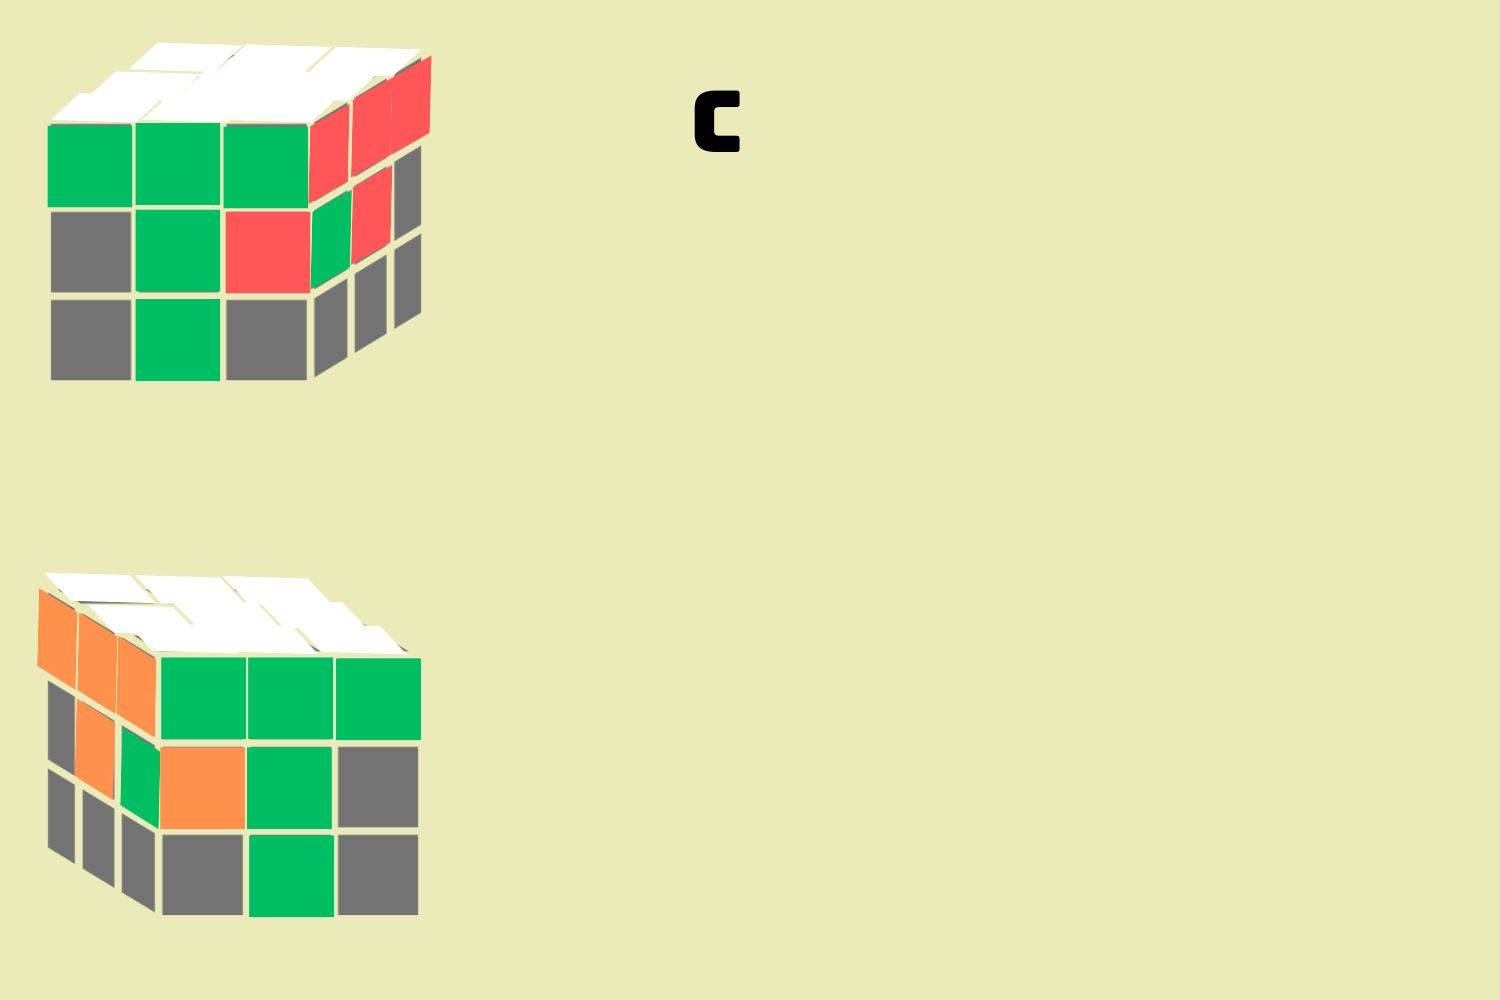
- If the edge piece is not in the bottom layer, proceed to Step C.
- Choose either Step A or Step B to place the edge piece in its correct position.

If you encounter any issues, such as the edge piece being in the wrong position or orientation in the second layer, follow these steps:
a. Rotate the cube so that the edge piece is in the front layer.
b. Use either Step A or Step B to move the piece into the bottom row.
c. Return to Step 4 above.
Repeat step A/B with different centers facing you until the second layer is completed.
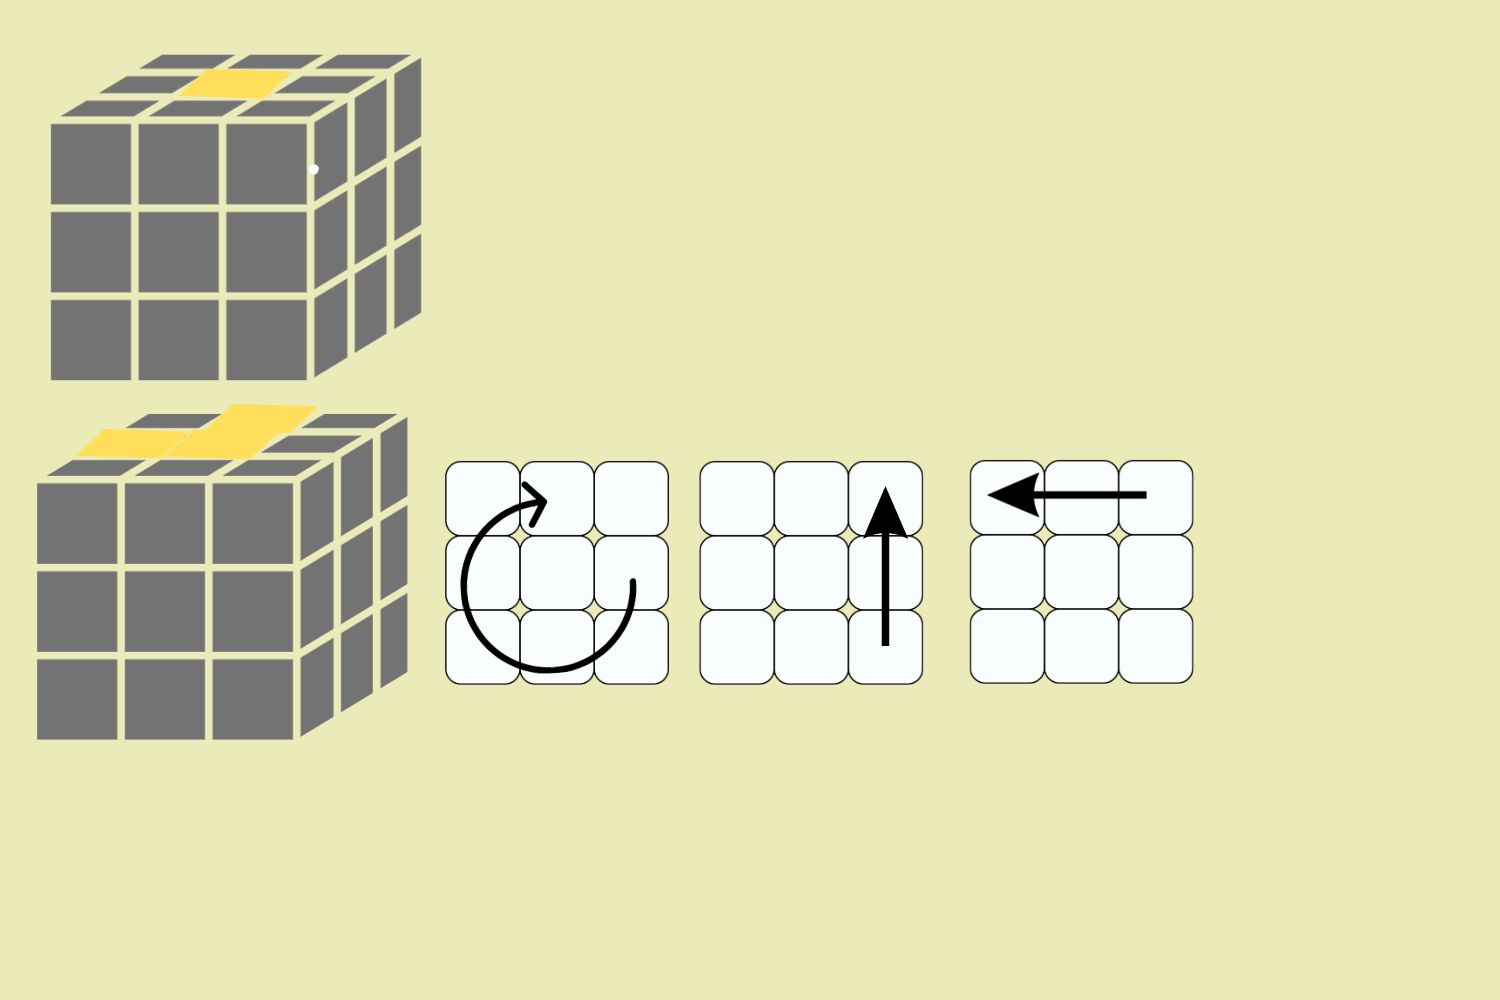
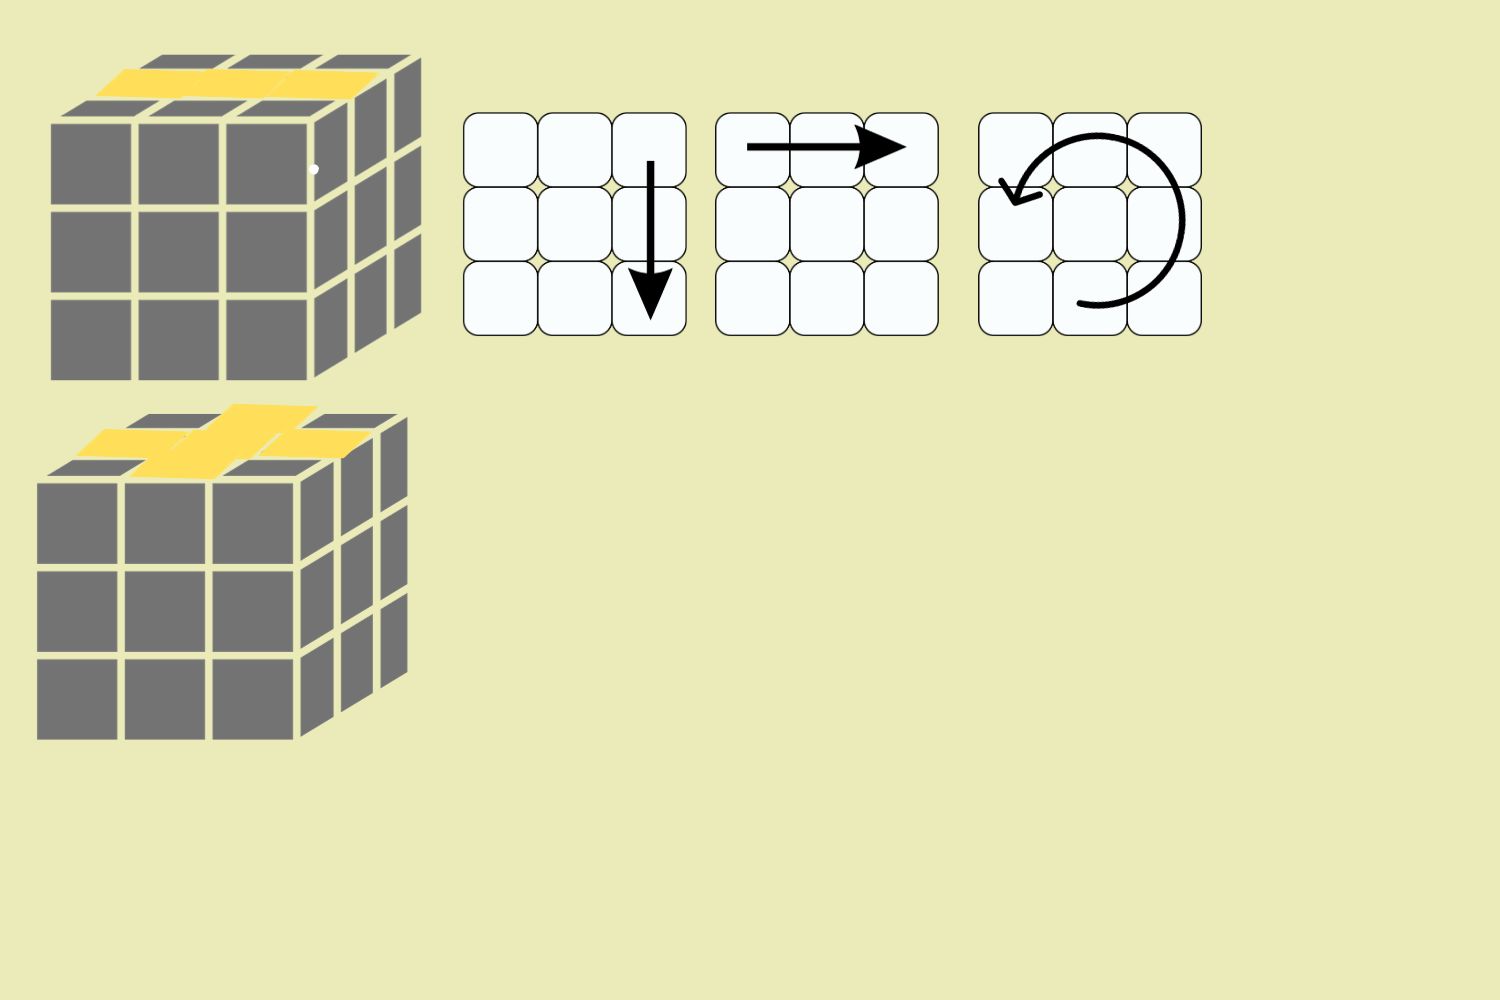
Step 4: Complete the Third Layer Cross
- Flip the cube so the white side is on the bottom and the yellow side is on top.
- Check if there are 0, 2, or 4 pieces of the cross facing upward, ignoring the corners for now.
- The goal is to first get the yellow cross and then rearrange the pieces to their correct positions in the cross.
- To achieve the yellow cross, follow the algorithm provided below. Make sure your cube is oriented as shown in the image.
- Keep repeating this algorithm until you have achieved the yellow cross.
- You will now have 4 or 2 edge pieces in the correct positions, matching the center colors. Ensure that the correct edge pieces are at the back and right face. Use the provided algorithm to place the edge pieces in their correct positions.
Possible Issue:
If two pieces that are in the correct position are opposite each other.
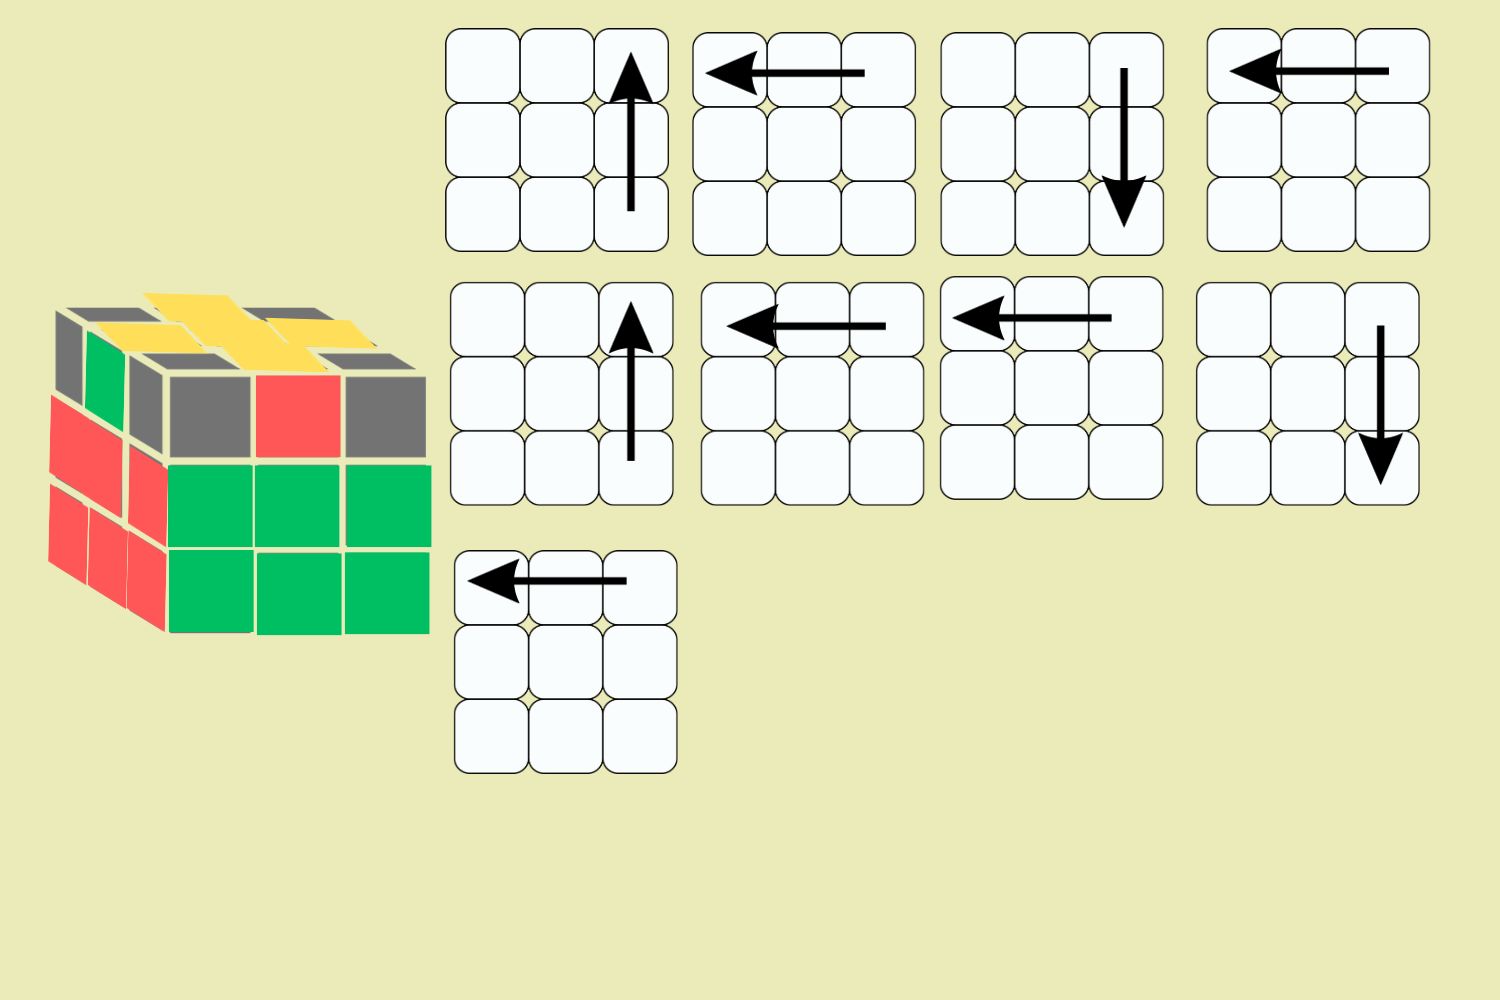
Solution: Follow the steps mentioned earlier once, then rotate the cube as shown in the image, and repeat the steps.
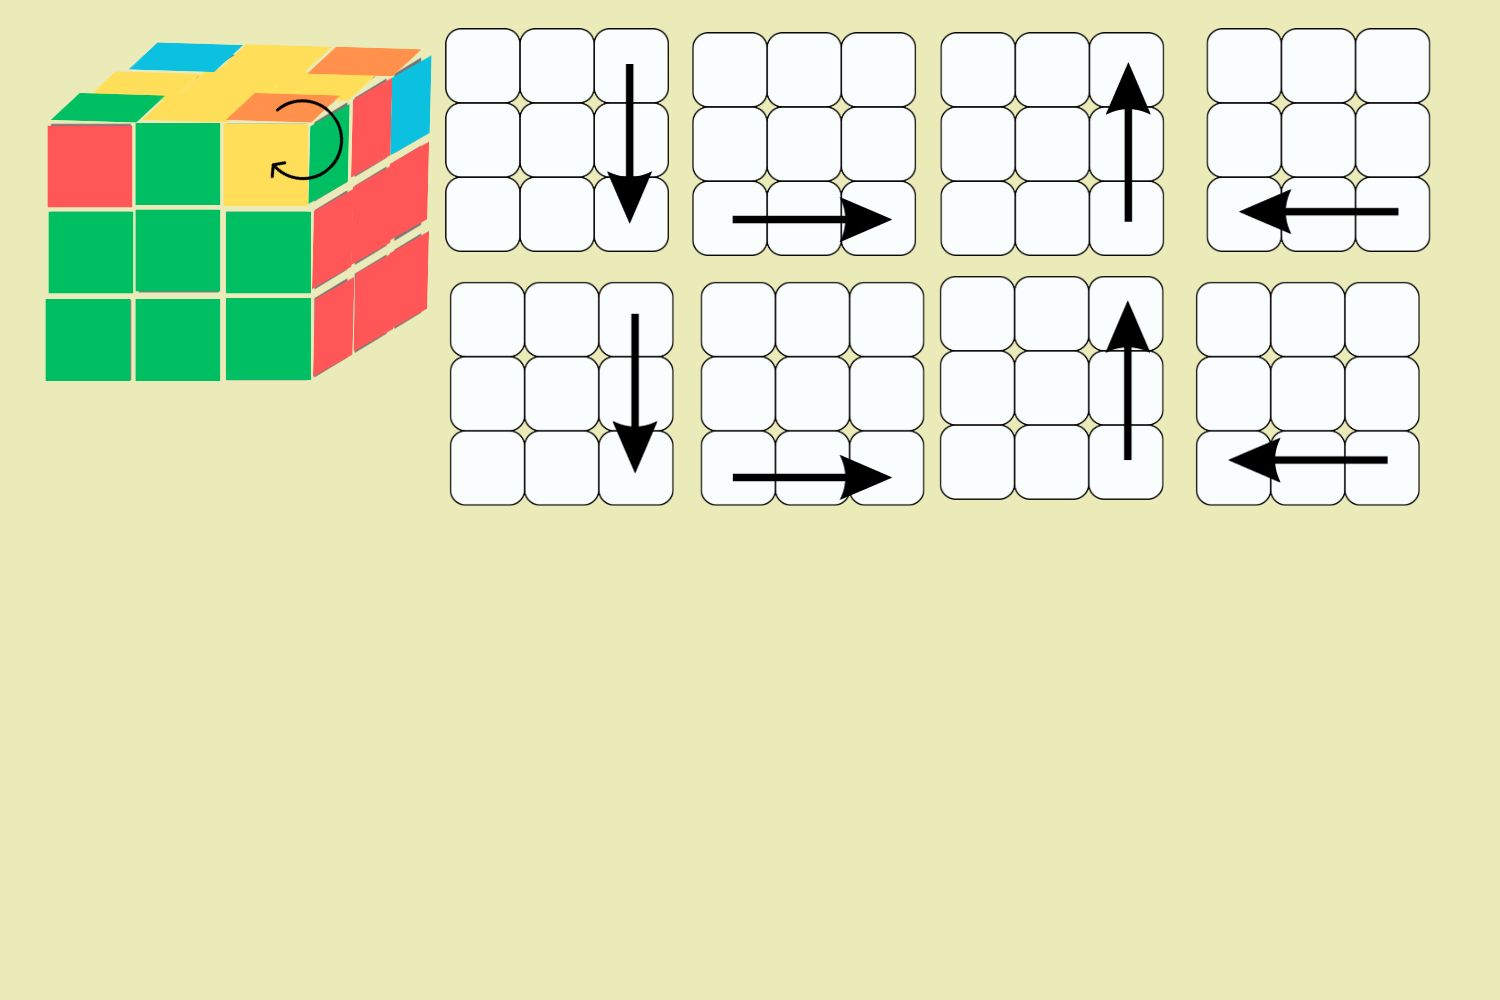
Step 5: Complete the Third Layer of Corners
- To begin, ensure that the corners are in the correct position. At this stage, some or all of the corners may already be in their correct positions, either upside down or not. If one corner is already in the correct position, rotate the cube so that this corner is in the front top right position. Keep in mind that while the corner may be in the correct position, it may still need to be turned the right way around.
- Repeat the above sequence until all the corners are in their correct positions.
- If none of the corners are in the correct position, perform the steps from (A) once with any side facing you, with the yellow side at the top. This will result in one corner being in the correct position. Proceed with the steps from (A) outlined above.

4. The following steps will correctly turn each corner and ultimately solve the cube.
5. Please note that this routine may appear to disrupt the rest of the cube. Do not worry and ensure that you keep the same side facing you. The cube will only be solved once the last corner is properly oriented.
6. Repeat the moves until the yellow side of the corner piece is on top. You may need to repeat this process 2-3 times.
7. Continuously keep the same side facing you. Rotate the top layer until the next corner piece to be rotated is in the top right position. Repeat the above sequence until the yellow side of the corner being rotated is on top. Continue this process until the cube is fully solved.
Here is a video
Solve the Rubik’s cube by Formula
We have another way to solve the Rubik’s cube using the formula, you can read on to learn more
Notation: Simplifying Layer Movements
To provide a clearer understanding, the following notations are used to denote the movement of the layer from its natural holding position:
R: Right side rotated clockwise [Right side upwards]
R’: Right side rotated anticlockwise [Right side downwards]
L: Left side rotated clockwise [Left side downwards]
L’: Left side rotated anticlockwise [Left side upwards] (Please note that L and R may initially seem confusing as their movements are opposite to each other)
F: Front side rotated clockwise
F’: Front side rotated anticlockwise
U: Upper face rotated clockwise
U’: Upper face rotated anticlockwise
Enhance your understanding of layer movements with these simplified notations.
Method
Step 1: Solving the White Cross
To begin solving the Rubik’s Cube, we will focus on the first layer, which is the white cross. Follow the steps below to complete this layer:
- Find a white edge on the cube and identify the non-white part of the edge (each edge has two colors).
- Match the non-white part to its corresponding center by using trial and error, typically taking only 2-3 moves.
- Once the piece is matched with its center, rotate it so that the white part aligns with the white center.
- Repeat this process for the remaining white edges until you have successfully formed a white cross.
Solving the White Corners
The next step is solving the white corners, which is fairly simple. Before proceeding, practice the following sequence of moves on your cube: R U R’ U’. This is your first algorithm.
- Start by positioning your cube with the white center at the bottom.
- Identify a white corner in the top layer and recognize the non-white parts of the corner.
- Rotate the top layer until the white corner is positioned between the corresponding centers of the non-white parts (refer to the image).
- Use the algorithm R U R’ U’ repeatedly until the white corner is correctly solved.
- Repeat this process for all the white corners.
By following these instructions, you will be well on your way to solving the Rubik’s Cube.
Step 2: Second Layer – Positioning Non-Yellow Edges
Algorithms Used:
- U R U’ R’ U’ F’ U F [center on the right]
- U’ L’ U L U F U’ F’ [center on the left]
The second layer focuses on placing non-yellow edges in their correct positions:
- Locate a non-yellow edge.
- Align the part of the edge in front of you with the center of the same color by rotating the top layer.
- Identify the part of the edge that is connected to the yellow center and find its corresponding center.
- If the center is on the right side of the current cube position, use the first algorithm. If not, use the second algorithm.
Step 3: Solving the Last Layer
1, Yellow Cross: F R U R’ U’ F’
Divide the yellow cross into three cases. Though the algorithm remains the same for each case, the initial positions vary. Identify the case on your cube and position it according to the corresponding position in the image. Simply repeat the algorithm until the cross is solved.
2, Positioning Last Layer Edges: R U R’ U R U2 R’
Now, align the edges in the last layer with their centers. Match any one edge of the top layer with its center in the middle layer. Repeat the algorithm until all edges match their centers.
3, Last Layer Corners: U R U’ L’ U R’ U’ L
To match all the corner pieces in the top layer, find a corner that is already matched and keep it towards the front-right of the cube. If none of the corner pieces are in the right place, you can hold the cube in any orientation with the unmatched pieces on top and apply the algorithm.
4, Top Layer Corners: R’ D’ R D
Now, keeping the yellow side on top and the unaligned corner on the front-right corner, use the above algorithm until the corner is aligned. Then, rotate the top layer and bring the unaligned corner to the front-right corner. Apply the same algorithm again until the corner is solved. Repeat the process until all the corners are solved.
What Are the Benefits of Solving the Rubik’s Cube
Now that you have learned how to solve the Rubik’s Cube, you may wonder what benefits it can bring. Here are some of the advantages of solving this puzzle:
- Improved problem-solving skills: Solving the Rubik’s cube requires a logical and methodical approach, which can improve your critical thinking and problem-solving abilities.
- Increased hand-eye coordination: Manipulating the cube’s pieces can improve your hand-eye coordination and fine motor skills.
- Enhanced memory and concentration: Solving the Rubik’s Cube requires you to remember specific algorithms, helping to improve your memory retention and concentration.
- Stress-relieving activity: Focusing on solving the Rubik’s cube can be a great way to relax and relieve stress.
- Sense of achievement: Completing the Rubik’s Cube can give you a sense of accomplishment, boosting your confidence and self-esteem.
So why not challenge yourself and learn how to solve the Rubik’s Cube? Not only will it provide hours of entertainment, but it also has numerous benefits for your brain!
Evaluate the Difficulty of Rubik’s Cube 3X3
Some may argue that solving the Rubik’s Cube is easy, while others may find it extremely difficult. The truth is, that the difficulty level can vary depending on an individual’s spatial awareness, problem-solving skills, and persistence. With practice and determination, anyone can learn how to solve the Rubik’s Cube.
However, it is worth noting that some numerous algorithms and methods can be used to solve the Rubik’s Cube, and some may be more challenging than others.
For example, some people prefer intuitive solving methods, while others rely on memorizing algorithms. It ultimately depends on personal preference and skill level.
One thing is for sure – solving the Rubik’s Cube takes time and patience. But the sense of accomplishment you feel after solving it is well worth the effort. So don’t be discouraged if you find it difficult at first – keep practicing and soon enough, you’ll become a Rubik’s Cube master!
Overall, the difficulty level of solving the Rubik’s Cube can be considered moderate to challenging, but with determination and practice, anyone can conquer this puzzle.
Additionally, there are resources available such as tutorials and online guides that can help make the process easier for beginners. So don’t be afraid to give it a try and see where your puzzle-solving skills can take you!
Keep in mind, that solving the Rubik’s Cube is not just about completing a puzzle – it’s also about gaining valuable skills and having fun in the process. Happy cubing!
FAQs
What is the world record time for solving the Rubik’s Cube?
As of now, the current world record for solving a standard 3×3 Rubik’s Cube is 3.13 seconds, set by Max Park.
Are there different sizes of Rubik’s Cubes?
Yes, there are various sizes of Rubik’s Cubes, including 2×2, 4×4, 5×5, and even larger cubes like the 17×17.
Are there any benefits to solving larger Rubik’s Cubes?
Solving larger Rubik’s Cubes can provide even more of a challenge and can help improve problem-solving skills and memory retention.
Can I create my algorithms for solving the Rubik’s Cube?
Yes, you can create your algorithms or modify existing ones to fit your solving style
How many different combinations are possible with the Rubik’s Cube?
There are 43,252,003,274,489,856,000 possible combinations for a standard 3×3 Rubik’s Cube.
How long does it take to solve the Rubik’s Cube on average?
The time it takes to solve the Rubik’s Cube can vary greatly depending on an individual’s skill level and the chosen method. On average, it can take anywhere from 2-10 minutes for a beginner to solve the cube.
Can solving the Rubik’s Cube improve cognitive skills?
Yes, solving the Rubik’s Cube has been shown to improve problem-solving abilities, memory retention, and hand-eye coordination. It is also a great way to relax and relieve stress. Overall, it can have a positive impact on cognitive skills.
Is there a specific age range for solving the Rubik’s Cube?
Anyone of any age can learn how to solve the Rubik’s Cube. However, younger children may find it more challenging due to their fine motor skills and understanding of algorithms. It is recommended for ages 8 and up.
Conclusion
Playing the Rubik’s cube is one of the most rewarding experiences–simple, but challenging. With a bit of practice and perseverance, you might be surprised at what you can accomplish.
Try to learn all the different techniques, combine them when you go for speed runs, and become proficient in solving the cube. Have fun with it!
Celebrate each successful solution with enthusiasm and try to enjoy every moment. Who knows? You just may discover hidden talents within yourself that have been there all along! So, make it your mission to continue learning about the Rubik 3×3 cube until you become an expert in no time!
Thanks for reading our article How to Play the Rubik 3×3? If you want to know more information, visit our website here.
Read more:
Why Puzzles Are Good for Brain?