This easy, step-by-step guide teaches how to solve a Rubik’s Cube 2×2. Get ready to show off your skills!
How to Solve a Rubik’s Cube 2×2?
Have you ever been intrigued by the challenge of solving a Rubik’s Cube? Have you tried to figure out the twisty puzzle but gave up in frustration before reaching a solution? If so, don’t give up! You can easily learn how to solve a Rubik’s Cube 2×2 with little knowledge and patience.
With this blog post, we will show you step-by-step how to solve the classic two-by-two version of the cube––the 2×2 Rubik’s Cube.
Whether this is your first time or if you’re looking for ways to improve your speed and accuracy, these techniques will help any aspiring solver become an expert in no time!
An Overview of the Rubik’s Cube 2×2
Introducing the 2x2x2 Rubik’s cube, also known as the Pocket Cube. Invented by Erno Rubik, this puzzle is considered the “easy” version of the iconic Rubik’s cube. If you already know how to solve the classic 3×3 cube, you’re in luck – you already know how to solve the 2×2 cube!
Here’s an interesting perspective: the 2×2 cube is essentially a regular 3×3 cube without the edges and centerpieces. So solving the 2×2 cube is equivalent to solving just the corners of the 3×3 cube. You’ll be surprised to find that many of the algorithms you already know from the speedsolving method apply to the 2×2 cube.
Before diving into the solution guide, make sure you’re familiar with the Rubik’s cube move notations. For the 2×2 cube, the notations are the same – same faces, same letters, same cube rotations. The only difference is the absence of “middle layer moves” since the 2×2 cube doesn’t have them.
The Basics of Solving a Rubik’s Cube
Colors
The Rubik’s cube consists of six sides, each representing a different color: white, yellow, blue, green, orange, and red.
Notation: Simplifying Layer Movements
To provide a clearer understanding, the following notations are used to denote the movement of the layer from its natural holding position:
R: Right side rotated clockwise [Right side upwards]
R’: Right side rotated anticlockwise [Right side downwards]
L: Left side rotated clockwise [Left side downwards]
L’: Left side rotated anticlockwise [Left side upwards] (Please note that L and R may initially seem confusing as their movements are opposite to each other)
F: Front side rotated clockwise
F’: Front side rotated anticlockwise
U: Upper face rotated clockwise
U’: Upper face rotated anticlockwise
Enhance your understanding of layer movements with these simplified notations.
How to Solve a Rubik’s Cube 2×2?
Method 1
Step 1: Solving the First Layer
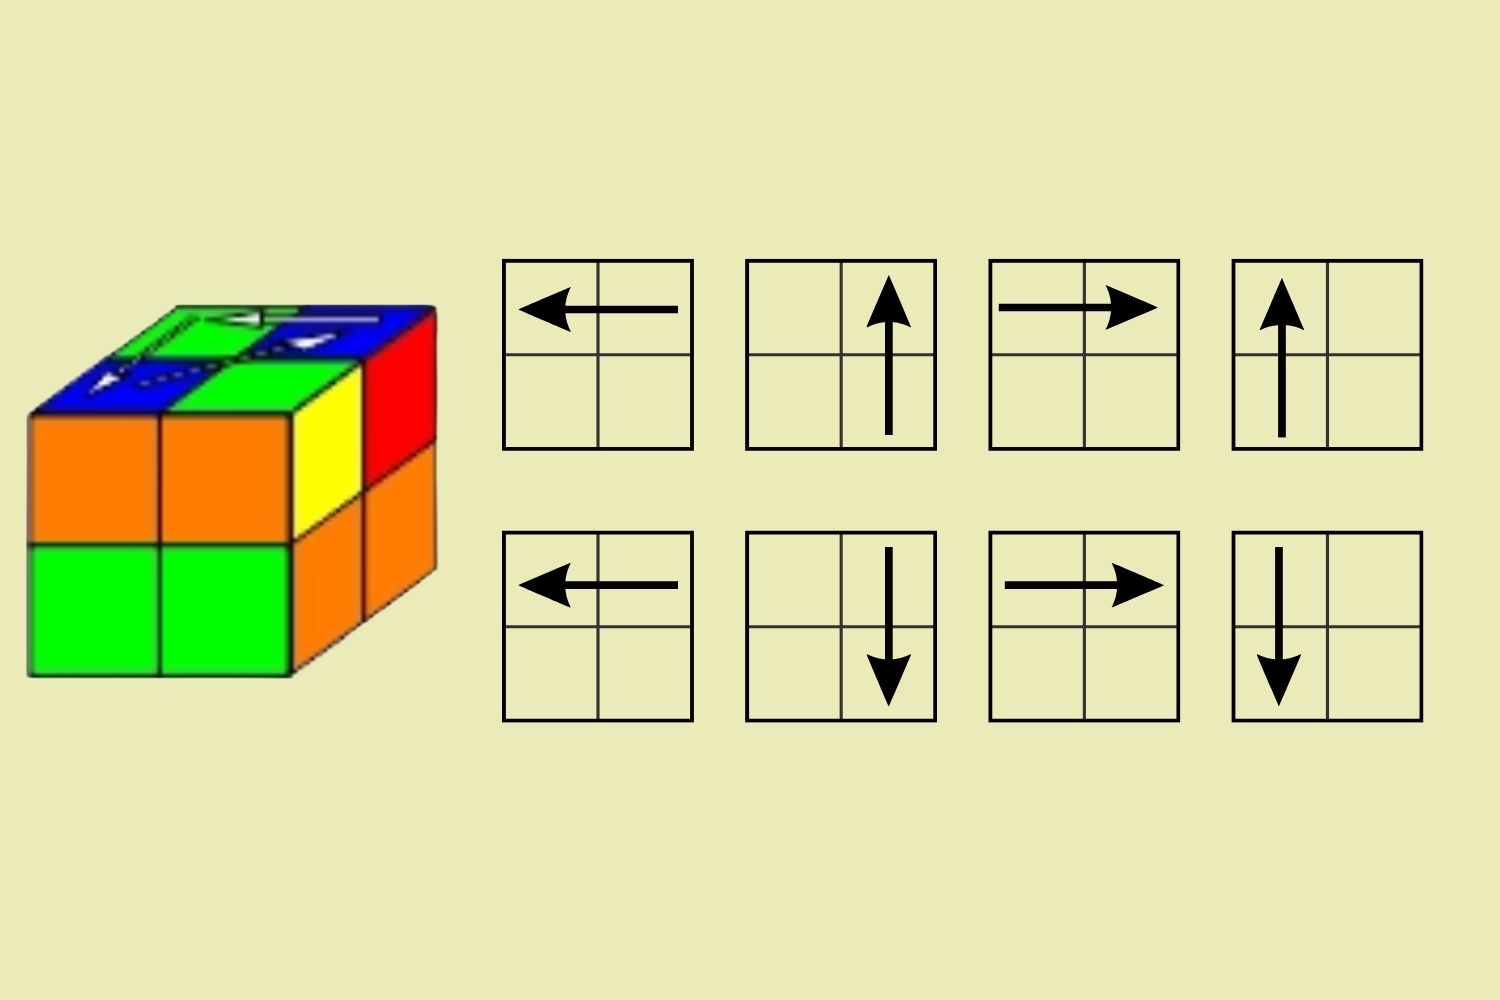
Step 1a: Completing the White Bar
- Locate the corner with white, red, and green colors on your Rubik’s Cube.
- Hold the cube with the white, red, and green corners in the front top left position, ensuring that the white face is on top.
- Note that the red side of the corner will be facing you and the green side will be on the left.
- Identify the corner with white, red, and blue colors on your cube.
- Move this corner to the bottom front right position, while keeping the white, red, and green corners in place.
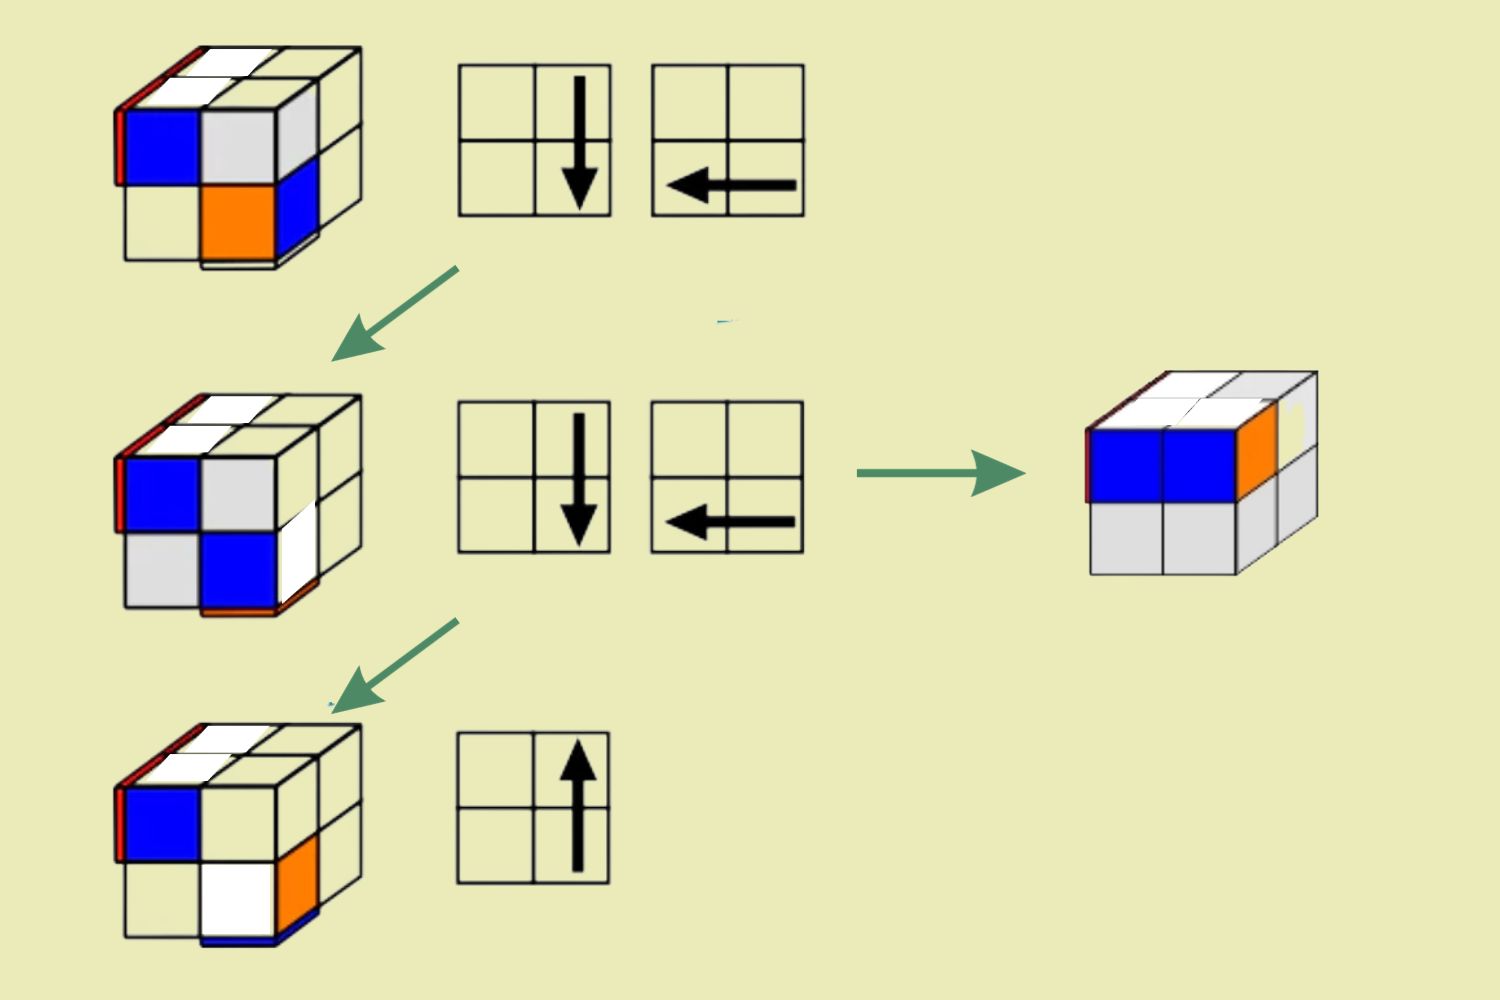
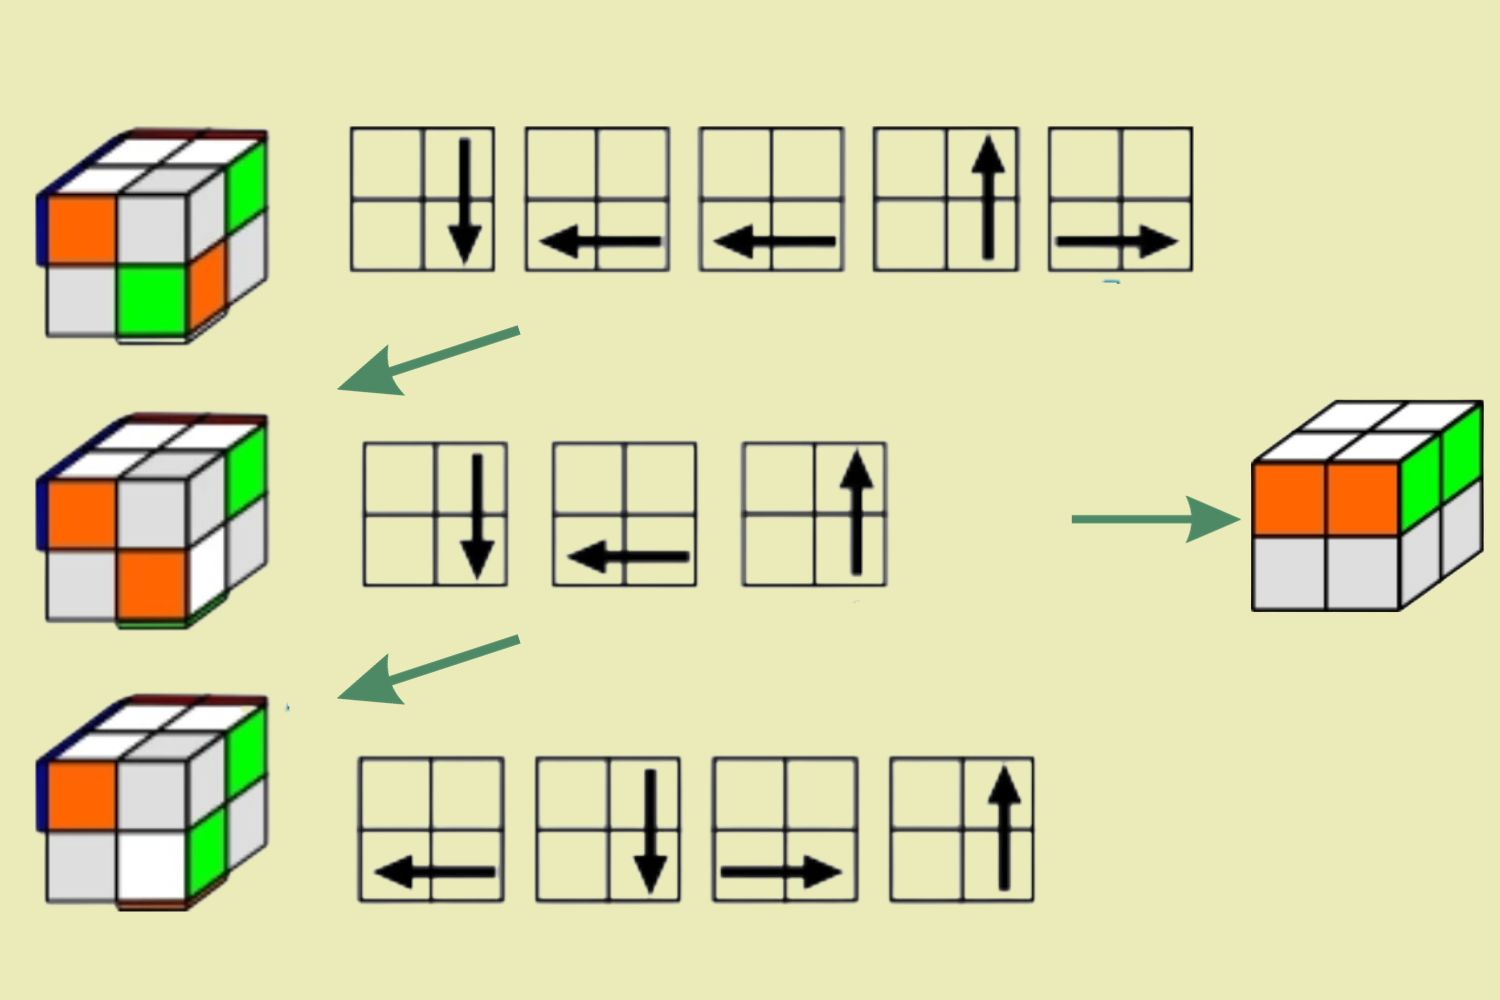
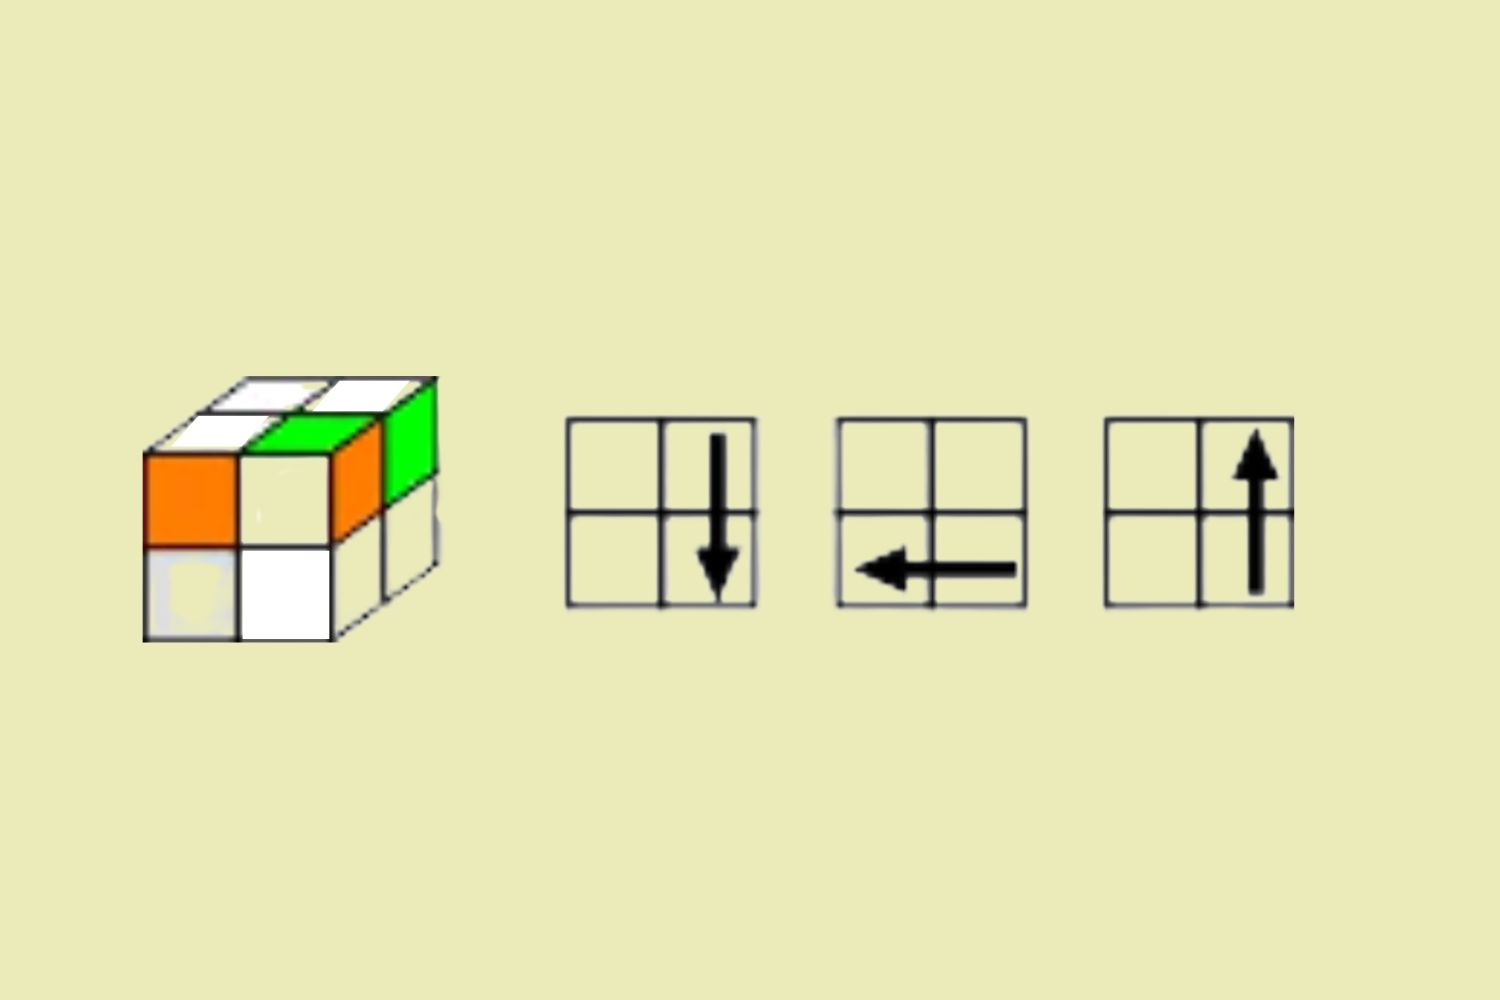
- Refer to one of the three color images provided below.
- Choose the image that matches the colors on your cube and follow the arrow steps to correctly position the white, red, and blue corners.

Complete these steps to complete the white bar on your Rubik’s Cube.
Step 1b: Finishing the 3rd White Corner
To complete this step, follow these instructions:
- Keep the white bar on top and rotate the cube to position the white/red/blue corner in the front top left.
- Note that the blue side of the corner should be facing you, while the red side should be on the left.
- Locate the white/blue/orange corner and move it to the bottom front right position, without altering the position of the white bar.
- Refer to one of the color images below that matches your cube.
- Follow the arrow steps provided to ensure the white/blue/orange corner is correctly placed.
Step 1c: Completing the 4th White Corner
- To complete the 4th white corner, first, ensure that the white side is facing upwards. Rotate the cube so that the white/blue/orange corner is now positioned at the front top left.
- Next, locate the white/green/orange corner and move it to the bottom front right position. Make sure to keep the 3 completed white pieces in place.
If you encounter any issues, such as the corner being in the wrong position or turned the wrong way around, follow these steps:
- Turn the cube so that the corner is in the front right top corner, then proceed to move the corner to the bottom layer by following the instructions provided.
- Refer to the appropriate color image below that matches your cube, and follow the arrow steps to place the white/green/orange corner correctly.
If needed, repeat these steps before choosing the next set of instructions to put the corner in its designated place.
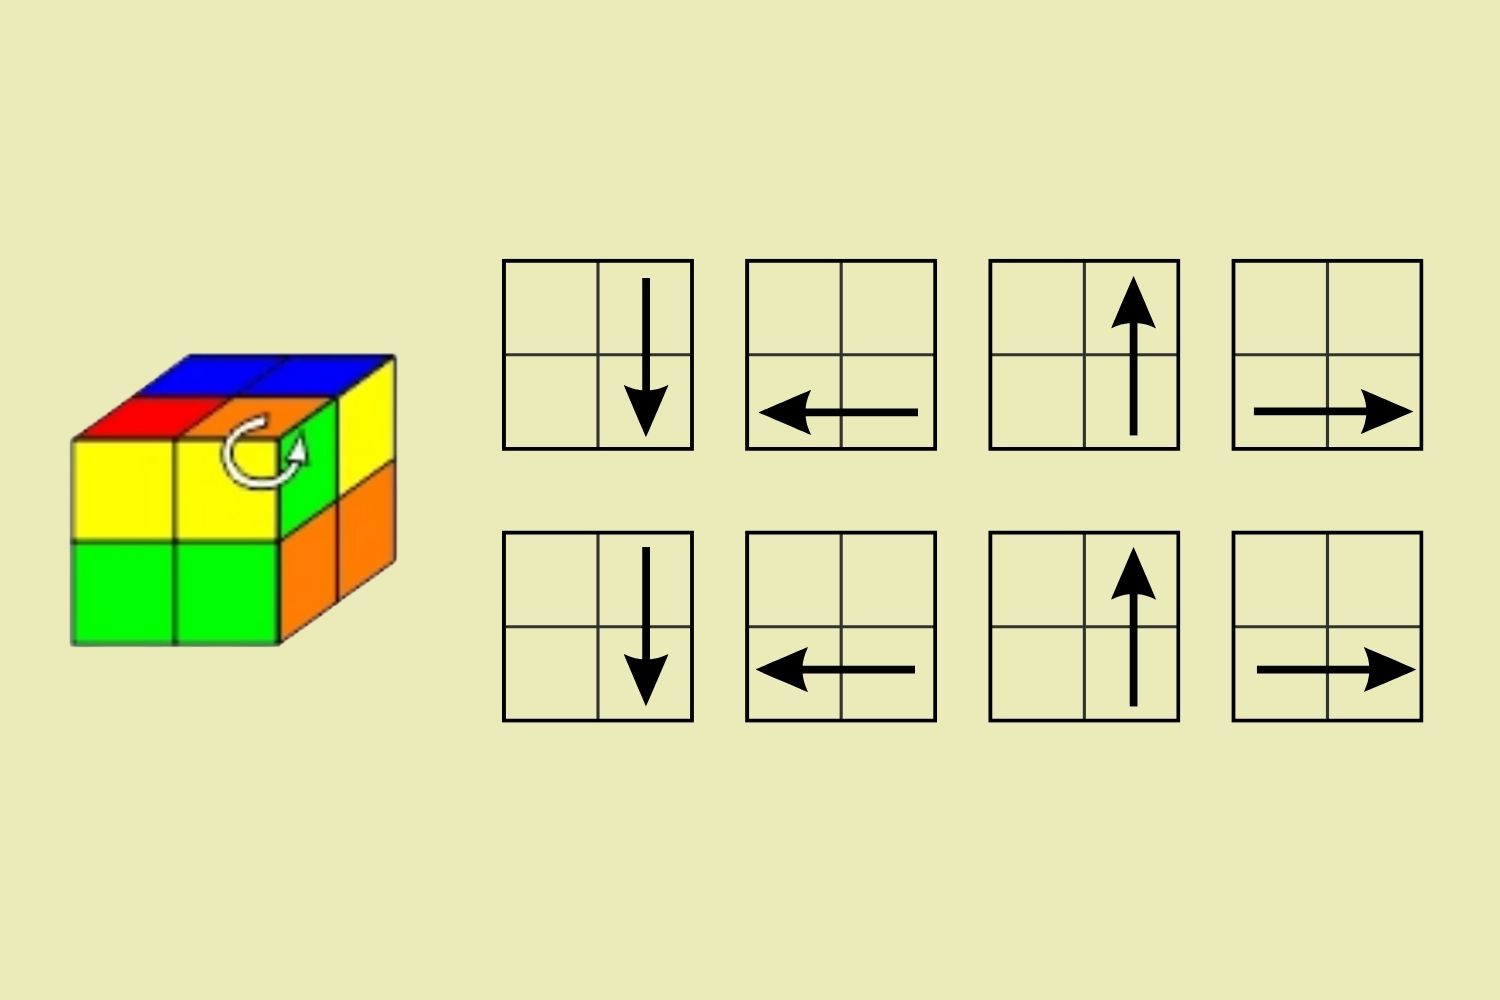
Step 2: Position the Last Layer of Corners Correctly
- Rotate the cube so that the white side is on the bottom.
- Adjust the top layer until only one corner matches the colors of the bottom corners, excluding white and yellow. This corner may not be correctly oriented. For example, in the image below, we placed the yellow/orange/green corner on top of the white/orange/green corner.
- Rotate the entire cube so that the correct corner is in the front top right position. The corner should be in the right position, but it may not be correctly oriented.
- Repeat the above steps until all the corners are in their correct positions, matching the colors of the bottom corners (excluding white and yellow). It is fine if the corners are not oriented correctly.
Possible Problem: Two corners are already in the correct position (matching their bottom colors).
Solution: Continue rotating the top layer (yellow) until only one corner is in the correct position.
Step 3: Orientate the Last Layer of Corners
In this step, we will turn each corner of the cube correctly to ultimately solve it.
Note: This process may temporarily disrupt the rest of the cube. Don’t worry and keep the same side facing you. It will only be fully solved once the last corner is correctly oriented.
Repeat the following moves until the yellow side of the corner piece is on top. This may need to be done 2-3 times.
Make sure to keep the same side of the bottom layer facing you. Then, rotate the top layer only until the next corner piece to be rotated is in the top right position. Repeat this sequence until the yellow side of the corner you are rotating is on top.
Continue this process until the cube is complete.
Method 2
Step 1: Solving the First Layer
Like method 1.
Step 2: Orienting the Last Layer Pieces
To orient the last layer pieces of a 2×2 Rubik’s Cube, follow these steps:
1. Flip the cube upside down so that the solved layer is now on the bottom.
2. The goal of this step is to complete the opposite colored layer (in our case, white as the opposite color to yellow).
3. Note that, unlike the first step, the orientation of the corners does not need to be correct about each other.
4. There are 7 possible cases for last layer orientations, excluding the already oriented case.
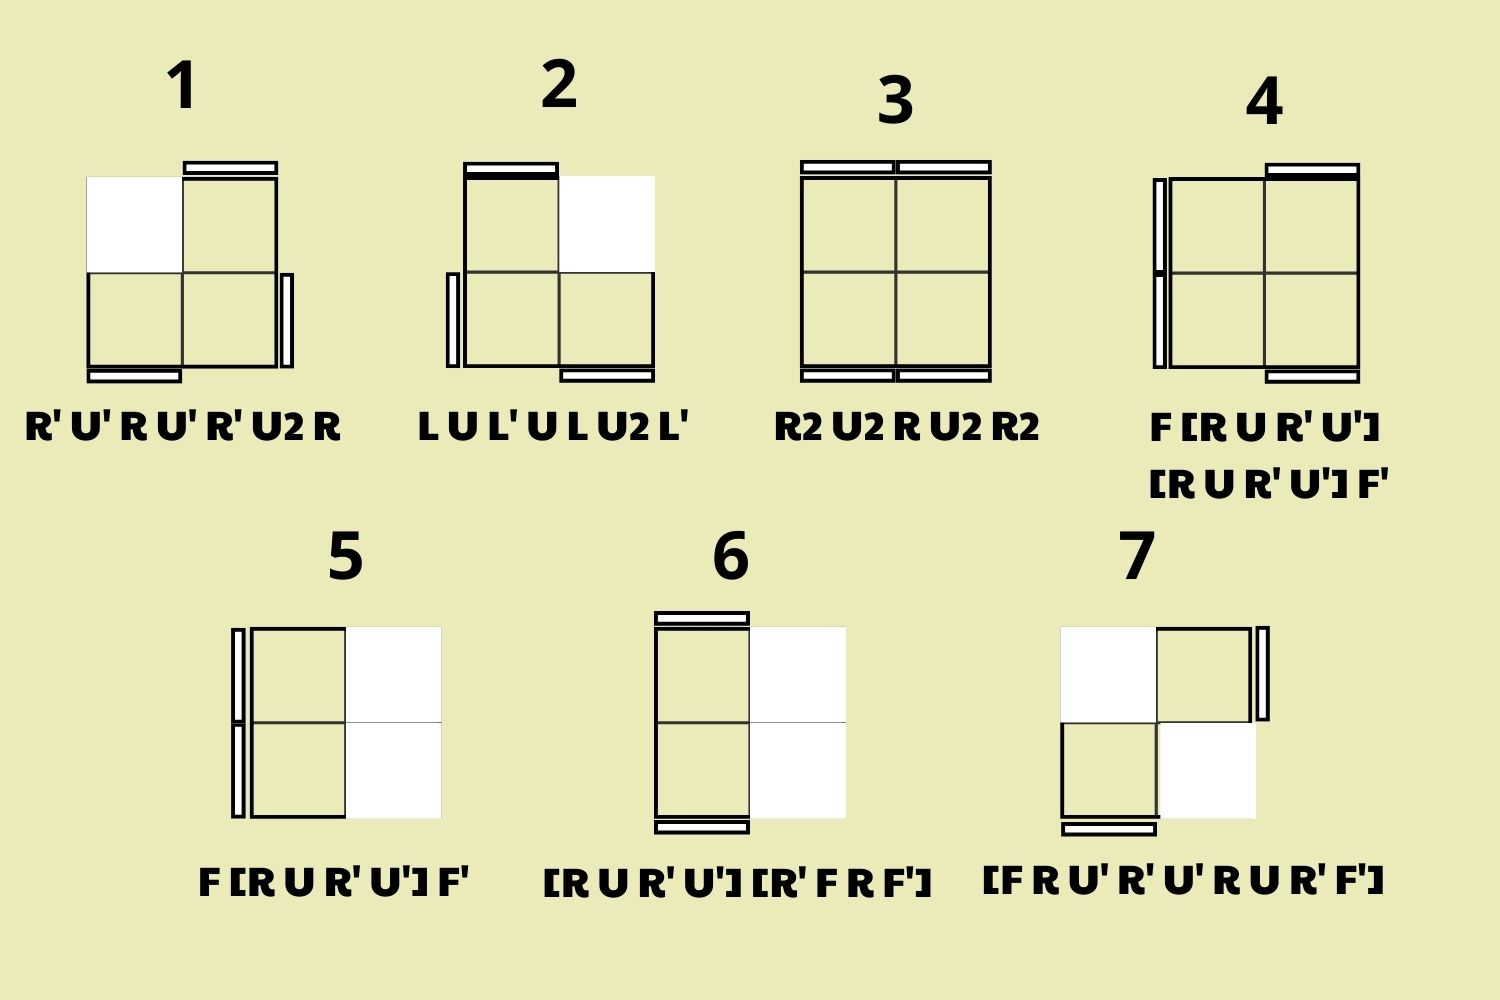
– The gray color indicates that the sticker is not the upper face color.
– The bars on the sides show where the upper face color is.
– However, the color difference does not matter.
5. Ideally, it is recommended to learn all 7 algorithms for this step.
6. However, it is possible to solve this step using only the first algorithm.
– The idea is to execute the first algorithm from different angles until the suitable case appears.
– Once the suitable case is found, execute the algorithm one more time to solve the step.
– It is possible to solve all possible cases within 3 executions, or 2 if the mirror algorithm of the first algorithm is also used (case #2).
7. The first algorithm orients 3 corners counter-clockwise while leaving the 4th corner intact.
– The mirror algorithm (case #2) does the same but clockwise.
8. Before executing the algorithm, consider from which angle it will leave only 1 corner oriented.
– This can be determined within 1 execution from all cases.
– Apply the suitable algorithm (case #1 or #2) accordingly.
– When a clockwise rotation is needed (case #2), it is possible to execute algorithm #1 twice instead of using the #2 algorithm.
– Doing a counter-clockwise rotation twice for the corners is equivalent to a clockwise orientation, which will solve them.
Step 3: Permuting the Last Layer Pieces on a 2×2 Rubik’s Cube
In this step, we aim to correctly rearrange the last layer pieces so that they are both oriented and positioned correctly about each other. This process closely resembles Step 5 of the beginner’s method for solving a 3×3 Rubik’s Cube. However, note that the algorithm I present here involves permuting the corners clockwise, rather than counter-clockwise.
To start, confirm that the cube is in the correct state for solving. Look for two corners that are already correctly permutated about each other. These can be easily identified by the fact that the two corners with the same color on their shared face are correctly solved. If you do not have two such corners, simply execute the following algorithm from any angle. This will result in two correctly permutated corners.
Next, perform some U-turns to align the two adjacent corners with their corresponding color on the bottom layer. Rotate the cube so that the solved color is on the right face (refer to the image above for reference).
Then, execute a U’ turn once. This move will result in the front-left corner becoming “solved,” while the other three corners will require a clockwise rotation between them. This rotation is precisely what the next algorithm accomplishes.
Now, execute the following algorithm (known as the Aa-perm algorithm, with ‘l’ replaced by ‘L’ due to the absence of a middle layer):
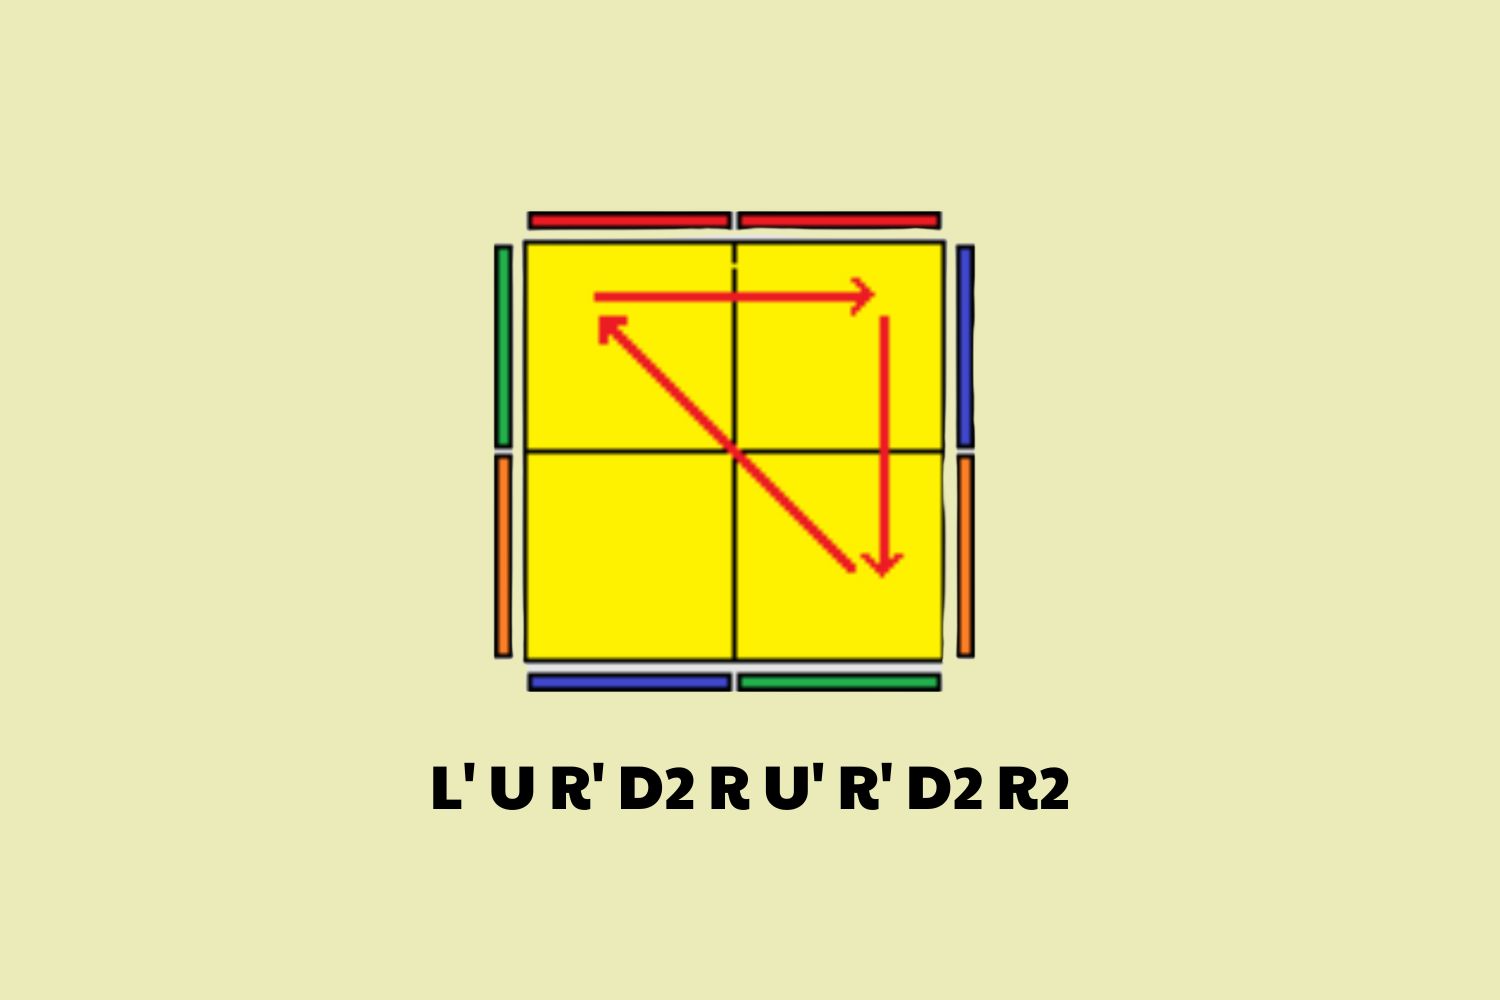
By following these steps, you will successfully permute the last layer pieces on your 2×2 Rubik’s Cube.
What Are the Benefits of Solving the Rubik’s Cube?
Solving the Rubik’s Cube offers several benefits to those who take up the challenge. These include:
- Improving problem-solving skills: Solving the cube involves analyzing and strategizing, which can help develop critical thinking and problem-solving abilities.
- Enhancing spatial awareness and visual perception: Manipulating different sides of the cube requires spatial awareness and visual perception, which can be improved with practice.
- Increasing patience and focus: The Rubik’s Cube requires patience and focus to solve, making it a great way to train these important skills.
- Boosting memory and muscle memory: Solving the cube involves memorizing algorithms and performing precise movements, which can improve both short-term and long-term memory as well as muscle memory.
- Providing a sense of accomplishment: Successfully solving the Rubik’s Cube can provide a great sense of accomplishment and boost self-confidence.
- Offering a fun and challenging hobby: Many people find solving the Rubik’s Cube to be an enjoyable and rewarding hobby, providing hours of entertainment and mental stimulation.
Overall, whether you are just starting or have been solving for years, there are plenty of benefits to be gained from solving the Rubik’s Cube. So grab your cube and start practicing today! Who knows, you may even become a speedcubing champion one day. The possibilities are endless. Keep solving and have fun!
Evaluate the Difficulty of Rubik’s Cube 2×2 vs 3×3
Many people may wonder, which is more difficult: the 2×2 or the 3×3 Rubik’s Cube? The answer is not so straightforward as it depends on individual experience and perspective.
On one hand, the 2×2 may seem easier due to its smaller size and fewer number of pieces. It only has 8 corner pieces compared to the 3×3’s 26. Additionally, there are fewer steps involved in solving the 2×2 as it only requires two algorithms for the last layer, while the 3×3 has six.
However, some argue that the smaller size of the 2×2 makes it more challenging to handle and manipulate. It may also require more precise movements due to the smaller pieces.
On the other hand, the 3×3 may seem more difficult because of its larger size and higher number of pieces. It also requires a deeper understanding of algorithms and their applications in solving various cases.
Ultimately, it is up to personal preference and skill level as to which cube may be perceived as more difficult. Both offer unique challenges and rewards, making them equally enjoyable to solve. So why not try both and see which one you prefer? Either way, solving a Rubik’s Cube is always a fun and rewarding experience!
FAQs
Can I solve a 2×2 Rubik’s Cube using the beginner’s method for the 3×3?
Yes, the beginner’s method for solving a 3×3 Rubik’s Cube can be adapted to solve a 2×2 Rubik’s Cube. However, some algorithms may need to be modified or replaced with more suitable ones.
Are there any other methods for solving a 2×2 Rubik’s Cube?
Yes, there are various methods for solving a 2×2 Rubik’s Cube, including the Ortega method and the CLL (Corners of Last Layer) method. These methods may involve different algorithms and approaches but ultimately aim to achieve the same goal of correctly permuting and orienting the last layer pieces.
How long does it take to solve a 2×2 Rubik’s Cube?
The time it takes to solve a 2×2 Rubik’s Cube varies greatly depending on an individual’s skill level, speed, and familiarity with the cube. On average, beginner solvers may take several minutes while advanced solvers can solve it in under 10 seconds. With regular practice and dedication, anyone can improve their solving time.
Can solving a Rubik’s Cube have any negative effects?
Solving the Rubik’s Cube is generally considered to have no negative effects. However, it may cause temporary hand fatigue or soreness if done for extended periods without proper rest and stretching. It also may become addictive due to its challenging but satisfying nature. As with any activity, it is important to practice moderation and take breaks when necessary. So remember to stretch those hands and enjoy the process!
Is it possible to solve the Rubik’s Cube without algorithms?
While some people may have a natural knack for solving puzzles and can solve the Rubik’s Cube intuitively, most people will need to use algorithms to effectively solve the cube in a reasonable amount of time. However, with enough practice and experience, it is possible to develop your own set of intuitive moves and techniques to solve the cube without relying on algorithms. Keep practicing and experimenting! Sooner or later, you may just surprise yourself.
Can solving the Rubik’s Cube improve your math skills?
There is no direct correlation between solving the Rubik’s Cube and improving math skills. However, as mentioned earlier, solving the cube can help develop critical thinking and problem-solving abilities, which are important skills in many areas of life, including math. Additionally, some algorithms used in solving the Rubik’s Cube involve mathematical concepts such as permutations and combinations. So while it may not directly improve your math skills, it can indirectly sharpen your mind and give you a better understanding of certain mathematical principles.
In conclusion, solving the Rubik’s Cube has countless benefits and can be enjoyed by people of all ages and skill levels. It challenges the mind, improves cognitive skills, and offers a fun and rewarding experience. So don’t hesitate to pick up a Rubik’s Cube and start solving it today!
Conclusion
It doesn’t matter if you are a novice or a Rubik’s Cube master – with patience and practice, anyone can learn how to solve the 2×2 Rubik’s Cube.
As challenging as it may be, becoming familiar with the different algorithms and sequences unlocks an exciting and rewarding new world of puzzles.
Over time, you’ll perfect your techniques, and increase your speed, and soon enough you’ll be solving the cube in seconds flat! Of course, improvisation is also key – every cube is different, so why not push yourself to experiment with different methods?
With a determined attitude and creative mindset, there’s no telling what kind of crazy patterns you could come up with! So get out there – go scramble that cube and have some fun. Good luck!
Thanks for reading our article How to Solve a Rubik’s Cube 2×2? If you want to know more information, visit our website here.
Read more: