Keep the little ones entertained and engaged this Thanksgiving holiday with these exciting turkey crafts for kids ideas – perfect for all ages!
Get Creative with These Fun Turkey Crafts for Kids
Bringing the magic of Thanksgiving and fall festivities into your home is easy with these fun, creative Turkey Crafts for Kids! From costume ideas to holiday decorations, there are so many ways to get crafty this season.
Not only will you create memories that will last a lifetime but you’ll also get the satisfaction of seeing smiles on little faces when they enjoy something they worked hard on — plus most can be finished in an afternoon or two. So grab some supplies (most are already around your house!) and have a blast making something festive!
14 Turkey Crafts for Kids Ideas
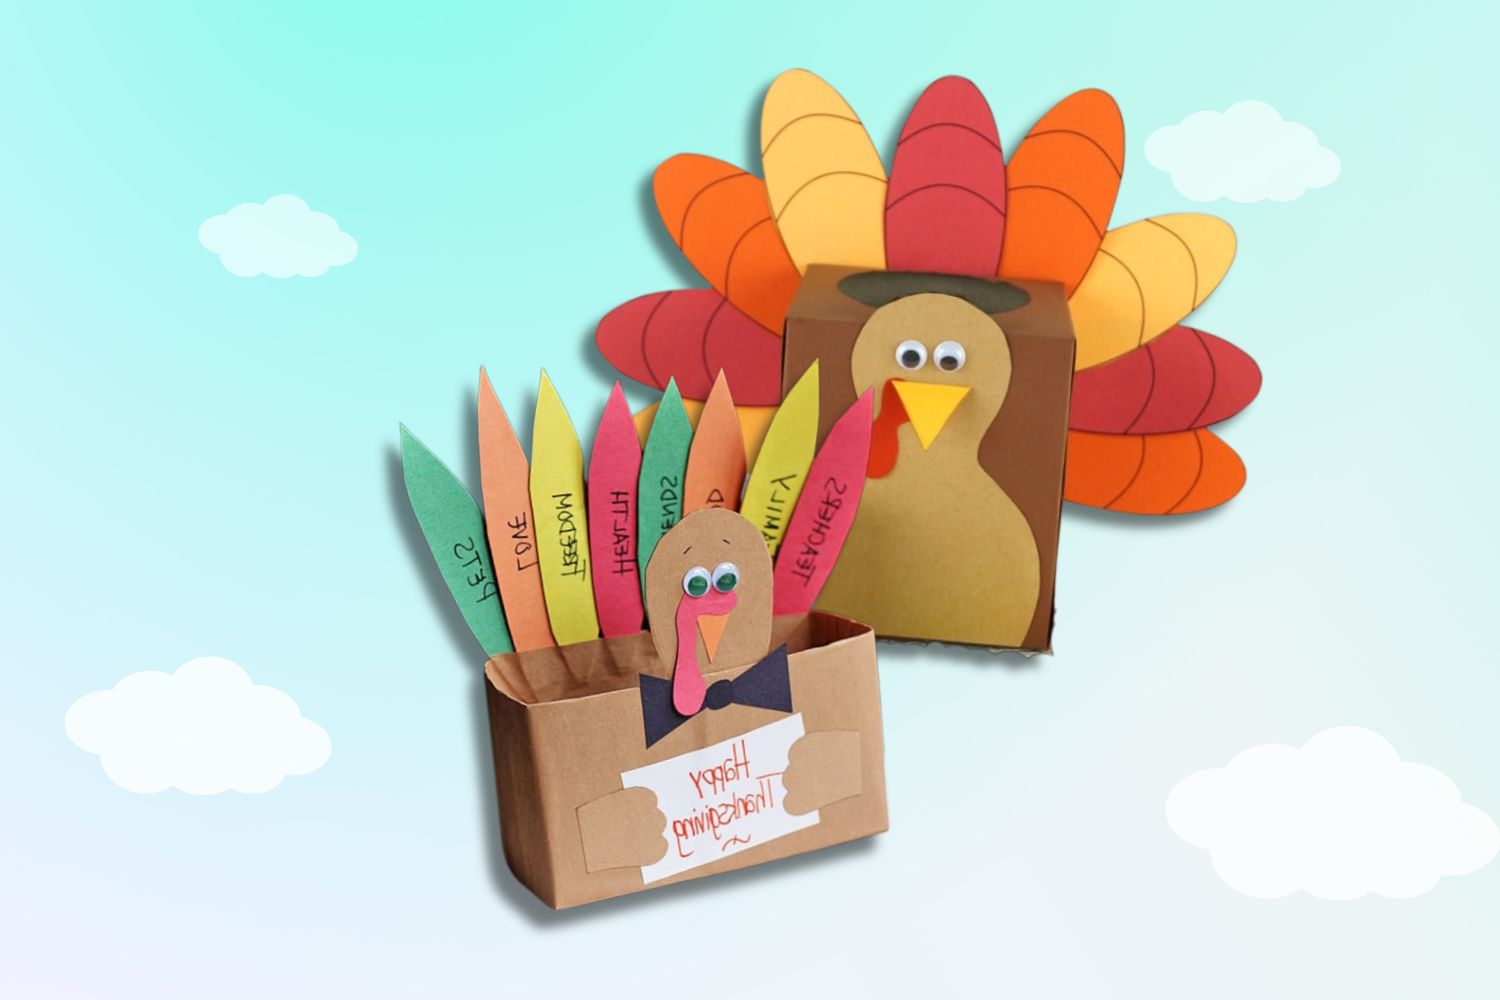
#1 Cereal Box Turkey
Supplies:
- Recycled cereal box
- Construction paper in the following colors: brown, red, yellow, orange, and green
- 2 googly eyes
- Scissors
- Glue stick
- Turkey pattern pieces
- White craft glue
Instructions:
- Cut a cereal box in half lengthwise and close up any open ends with tape.
- Use a ruler to measure 4 inches from each side and cut out the center. Set this extra cardboard aside for later.
- Place one end of the box inside the other, slightly overlapping, and tape the two pieces together.
- Cover the box with brown construction paper using a glue stick.
- Cut out the turkey head from the remaining cereal box cardboard and cover it with construction paper. Glue it inside the box as shown.
- For the feathers, measure and cut cardboard strips to 6 ½ inches x 1 ½ inches. Cover these strips with red, orange, green, and yellow construction paper using a glue stick.
- Have your kids write what they are thankful for on the strips with a black marker, then trim them into feather shapes. Attach these feathers to the back of the turkey box using white craft glue and allow them to dry.
- Cut out the remaining pattern pieces (bow tie, beak, gobbler, hands) from black, orange, red, and brown construction paper.
- Draw a “Happy Thanksgiving” sign on white paper and attach the brown construction paper hands to either side of the sign. Glue the sign and hand it to the front of the turkey.
- Glue the bow tie and eyes onto the turkey. Then, attach the beak and gobbler, allowing everything to dry before displaying it on the table.
#2 Turkey Windsocks
Supplies:
- Clean and dried recycled food cans without top and bottom
- Brown paint
- Elmer’s CraftBond Quick Dry Glue
- Elmer’s Medium Tip Painters Pen in orange
- Large googly eyes
- Ribbons in autumn hues
- Fall-colored feathers, felt, and/or construction paper (can be combined)
- Optional: masking tape
Instructions:
- Begin by painting the can brown and ensuring it is fully dry before proceeding.
- Use a Painters marker to draw the turkey’s beak onto the can.
- Attach the googly eyes to the can using Elmer’s CraftBond Quick Dry glue.
- Secure the turkey’s tail “feathers” (made from feathers, construction paper, felt, etc.) by applying a thick line of glue inside the rim at the back of the can. If the rim is sharp, cover it with masking tape for safety.
- Cut 10-15 pieces of ribbon that are approximately 18″ long.
- Apply another thick line of Elmer’s CraftBond glue around the entire inside rim at the bottom of the can. Use the glue to attach the ribbon streamers. Allow everything to dry fully.
- Attach a red wattle (made of felt or paper) and a ribbon for hanging using the glue.
- Enjoy the simplicity and cuteness of your handmade turkey decoration!
#3 Turkey juice box craft
Supplies:
- Juice box
- Colorful assortment of paper
- Googly eyes for added fun
- Reliable glue for secure attachments
- Sharp scissors for precise cutting
Instructions:
Step 1: Measure and Cut. Begin by measuring the height and circumference of the juice box. Cut a piece of brown paper to create the body of the turkey, ensuring that it is long enough to cross over at the back and can be securely glued into place.
Step 2: Attach Feathers. Cut out feather shapes, resembling leaves, and glue them onto the back of the juice box.
Step 3: Add Facial Features. Cut out a beak and wattle for the turkey, as well as googly eyes. Glue these features onto the juice box as well.
Step 4: Turkeys and Treats. Remember to serve enjoyable turkey-themed snacks along with your turkey juice box creation.
#4 Clothespin Turkey
Supplies:
- Clothespins
- 3 feathers for each clothespin
- 2 googly eyes per clothespin
- A scrap of orange construction paper
- Scrap of red construction paper
- Scissors
- Craft glue or hot glue for securing the parts together.
Instructions:
- Apply glue to one side of the clothespin and carefully attach the feathers. Allow ample drying time. We recommend using Elmer’s school glue for the best results. Please exercise caution if you choose to use hot glue, to ensure the safety of little fingers.
- Glue googly eyes onto the opposite side of the clothespin.
- Below the eyes, snip a small triangle from orange construction paper to represent the beak.
- Cut a small squiggle shape from red construction paper and attach it to the side of the orange beak using glue.
- Allow the craft to dry completely.
- Enjoy the finished Thanksgiving turkey craft!
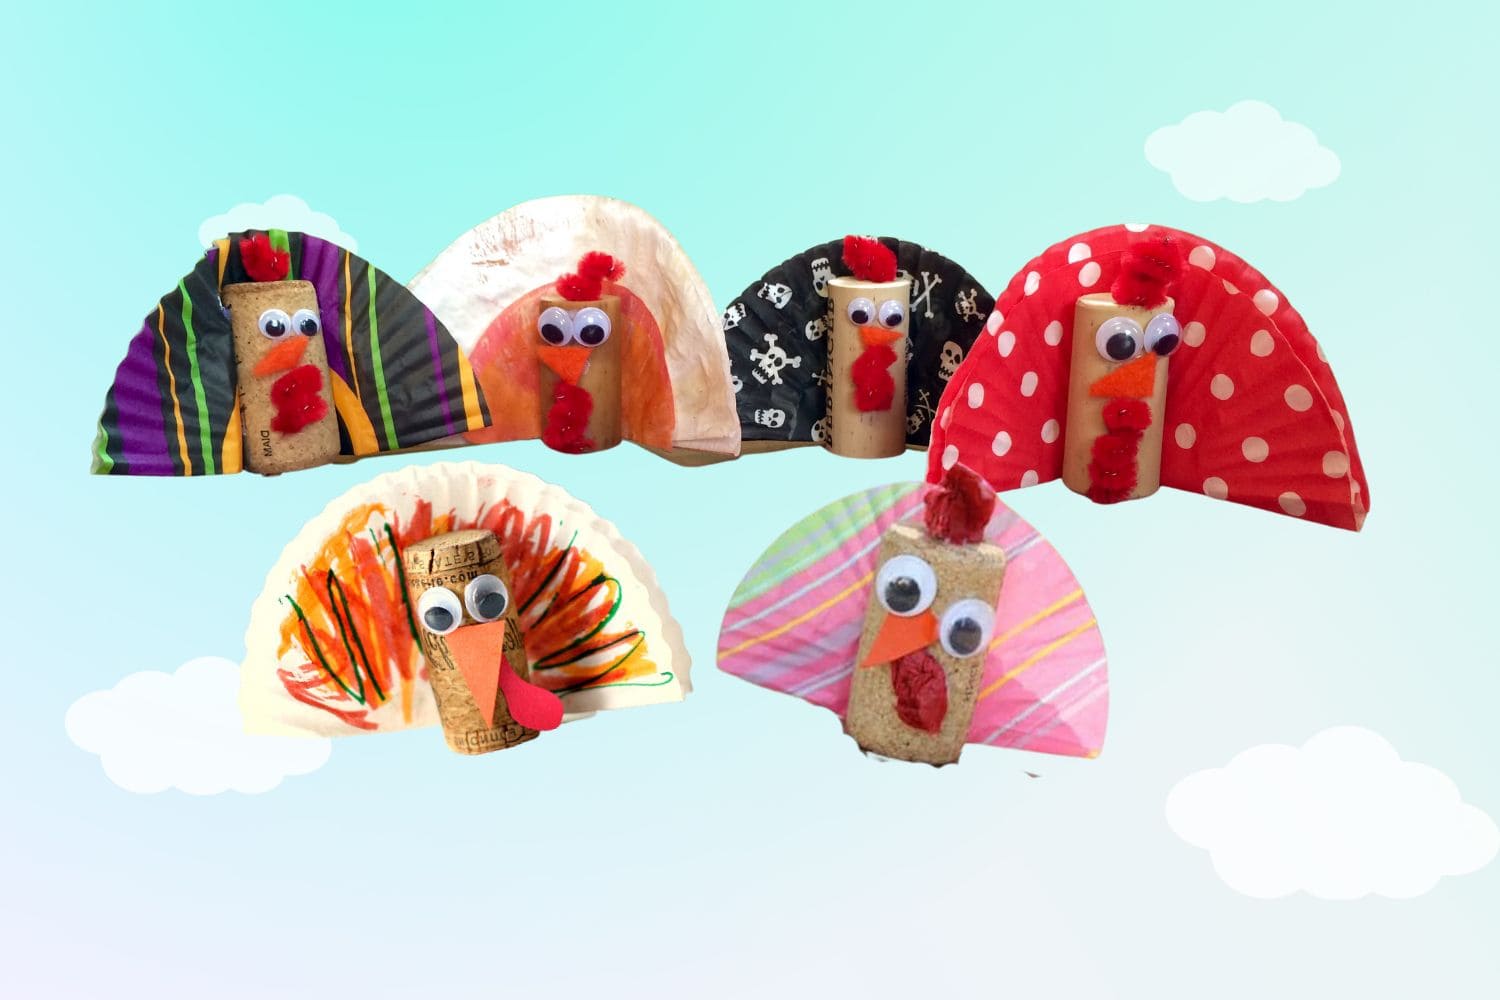
#5 Cork Turkeys
Supplies:
- Cupcake liners
- Wine corks
- Googly eyes
- Markers
- Red and orange paper
- Glue
- Scissors
Instructions:
- Fold the liners in half and choose your desired colors.
- Allow your child to color the liners while you cut out the gobble and beak.
- Once colored, apply glue to the corks – don’t worry about any dripping, it will dry clear.
- Attach the eyes, turkey craft with cork gobble, and beak.
- Lastly, add some glue to the cork and place it on the colored liners.
- Allow the craft to dry. Enjoy your cupcake liner turkey creations!
#6 Simple Paper Bag Turkey
Supplies:
- Paper Bag
- Googly Eyes
- Construction Paper or orange cardstock
- Feathers
- Tacky Glue or hot glue (adult supervision required)
Instructions:
- Begin by attaching the feathers to the back of the paper bag. Keep in mind that the flapped portion should face forward to serve as the face. I recommend using tacky glue or hot glue (adults should assist) for the feathers. If you prefer, white glue can also be used, but allow ample time for drying before handling the paper bag.
Continue gluing until the back of the bag is filled with feathers. Feel free to choose any color combination you desire, and encourage kids to create patterns!
- Affix 2 googly eyes to the front of the bag. Alternatively, you can draw eyes on white paper and attach them with glue.
- Cut out a triangle shape for the beak using orange construction paper or cardstock. Glue the beak below the googly eyes.
Now that your turkey is complete, children can put their hands inside the bag to utilize it as a puppet!
For even more fun, create multiple turkeys and organize a Thanksgiving puppet show!
#7 Thanksgiving Turkey Balloons
Supplies:
- 12″ helium-grade balloons in a dazzling gold shade
- A variety of feathers for a touch of elegance
- Baker’s twine, string, or curling ribbon to add a festive touch
- Adorable googly eyes to bring your turkey balloons to life
- Beak and waddle cut-outs made from sturdy construction paper or card stock
- A trusty glue gun for easy assembly
- Scotch tape to keep everything in place (not shown)
Instructions:
Step 1: Inflate your balloons effortlessly
Elevate your Thanksgiving decor with delightful turkey balloons. Inflate your balloons with helium, either at home using a personal tank or through your local party store. These balloons will gracefully float for 4-6 hours. For extended enjoyment, request the party store to apply HiFloat to make them last longer.
Step 2: Securely attach string to the balloon
Ensure the perfect turkey presentation by taping a piece of baker’s twine or string to the center of the balloon using two pieces of scotch tape. This will form the underside of your lovely turkey decoration.
Step 3: Enhance its personality with adorable details
Give your turkey balloon character by creating a small beak and waddle from paper. Using a small dab of hot glue, carefully affix them to the bottom of the balloon (where it is tied), and add two charming googly eyes just above the beak. Rest assured, the hot glue won’t harm or pop the balloon.
Step 4: Perfectly feathered perfection
Complete your turkey balloon by adding feathers to the backside. Apply a small dab of hot glue to the tip of each feather and attach them high enough on the balloon for a delightful peek-a-boo effect. Be mindful not to weigh the balloon down – aim for around 6 feathers for the optimal look.
That’s it! Add a touch of surprise to your Thanksgiving kids’ table by tying these adorable turkey balloons to each chair. Get ready for a joyful celebration with these delightful decorations.
#8 Paper Bag Roast Turkey Craft
Supplies:
- 1 Grocery Bag + 2 Paper Lunch Bags OR 1 Paper Lunch Bag + 2 Smaller treat bags (Choose the size that suits your preference!)
- “Stuffing” for the turkey, such as confetti or popcorn
- Tissue Paper
- Scissors
- Hot Glue and/or Glue Dots
Instructions:
Step 1: Prepare Your Lunch Bag
Gently press down the corners of your lunch bag by placing one hand inside and pressing the other hand against the outside.
Step 2: Stuff Your Bag
Fill your bag with your desired stuffing.
Step 3: Roll and Fold
Roll the top of your stuffed lunch bag and carefully fold in the bottom sides, creating angled edges on each side of the rolled opening.
Step 4: Prepare the Turkey Legs
Repeat the previous step with the treat bags for the turkey legs. Squash down the corners of each bag and fill them with confetti or popcorn. Twist the bottom portion closed.
Step 5: Add Fringe
Cut a 2-3″ strip of tissue paper and create fringe on one side. Attach one end to the twisted part of the turkey leg and wrap it around, securing it with a glue dot.
Step 6: Attach the Legs
Using hot glue, attach a turkey leg to each side of the stuffed lunch bag. The legs should fit perfectly along the angled edges you created.
#9 Roast Turkey Piñata

Supplies:
- Paper-mache paste (made with 1 cup flour and 1 cup water)
- Strips of newspaper or packing paper (newspaper for durability, packing paper for simplicity)
- Clear tape
- Water balloons (3 per pinata)
- Mini Styrofoam eggs (2 per pinata)
- Scissors
- Box cutter
- Sponge brush
- Small paintbrush
- Paper straw (1 per pinata)
- Apple Barrel Paint (caramel and white)
- Paint palette
Optional:
- Cookie cooling rack
- Wax paper
- Balloon pump
Instructions:
- Inflating the balloons: Blow up the first balloon fully for the body, and partially inflate the second two to create round turkey “legs.”
- Attaching the legs: Cut the paper straw into four 1-inch pieces, tape them together in pairs, and attach the “leg” balloons to the straw pairs. Then, tape a mini Styrofoam egg to the opposite end of the straw pairs. Finally, tape the legs to the body slightly underneath, with the balloon ends at the wider end of the body.
- Applying paper-maché: Dip newspaper strips in paper-maché paste and cover the balloon “roast” with the strips. Allow it to dry overnight and apply a second coat the next day. Use wax paper and a cookie cooling rack to dry the roasts.
- Creating a candy door: When the second coat is dry, use a box cutter to cut a rectangle on the bottom of the turkey as a door for filling with candy or prizes. Make sure it’s easy to remove the balloon from the turkey’s body.
- Painting and filling the piñata: Paint the turkey body in a caramel color using a sponge brush. Use a mix of caramel paint and white to paint the “bones” on each leg. Once the paint is dry, fill the piñata with paper shreds, confetti, and goodies.
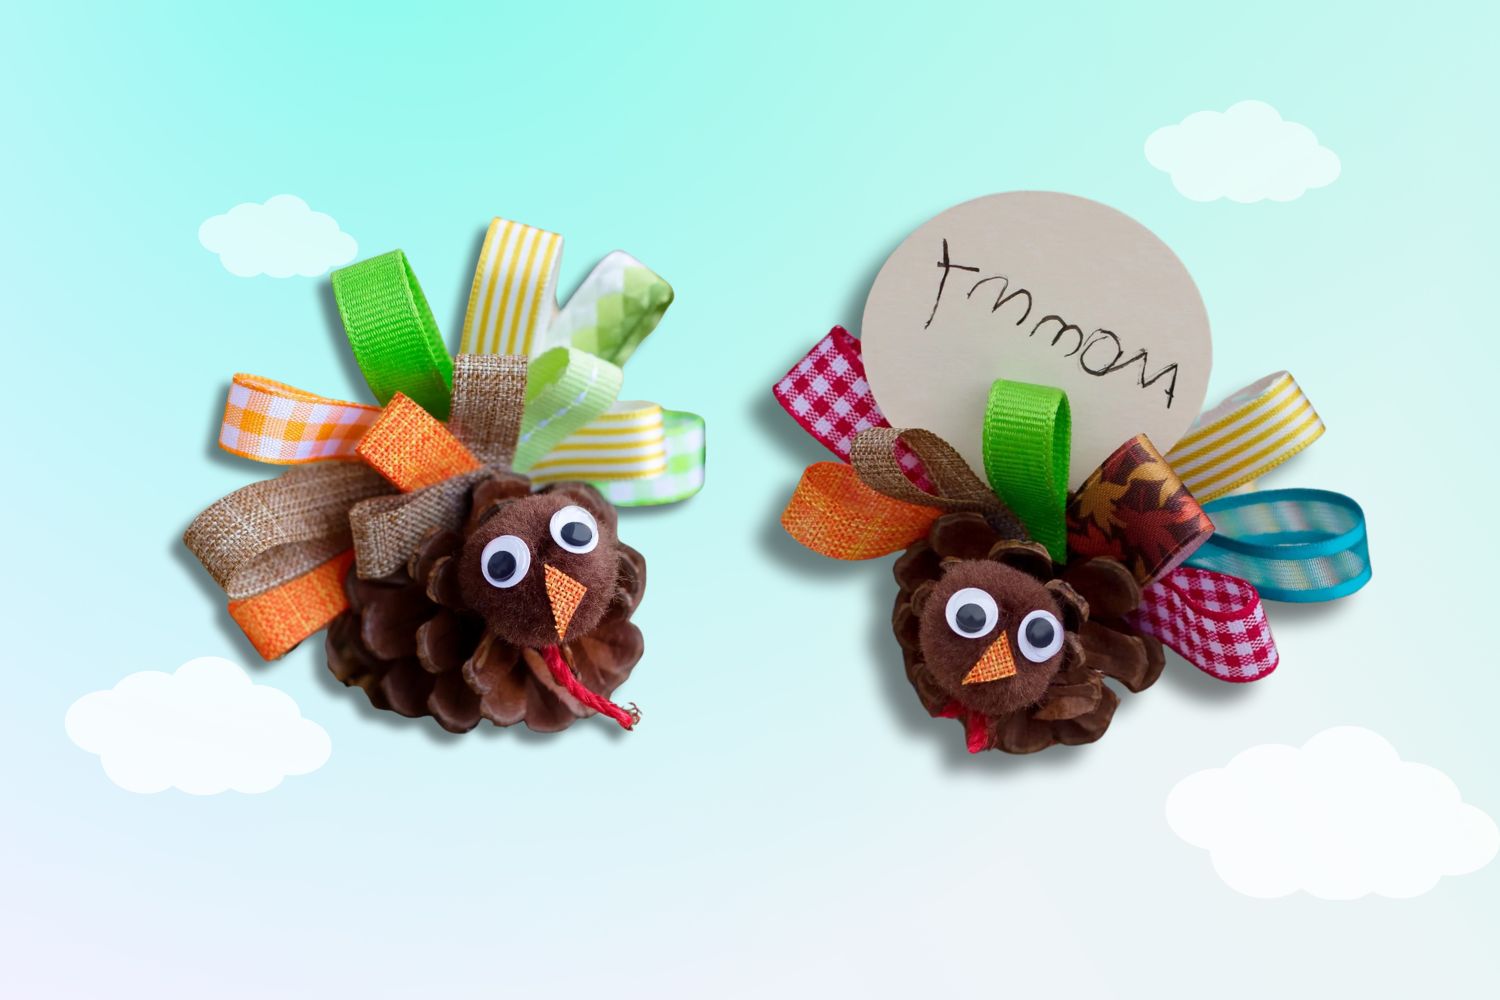
#10 Pine Cone Turkey Craft
Supplies:
- Pine cones
- Various scrap ribbons
- Brown pom poms
- Wiggly eyes
- Vibrant red twine
- Reliable hot glue gun
- Trusty pair of scissors
Instructions:
- Use a hot glue gun to create ribbon loops and shape them into an arc. String them together using hot glue. Repeat with smaller pieces of ribbon to create the turkey feathers.
- Slide the feathers into the pine cone and secure them in place with hot glue.
- Attach two wiggly eyes to a brown pom pom. Cut a small triangle from the orange ribbon and glue it to the pom pom.
- Use hot glue to attach the turkey head to the pine cone.
- Finally, create a small loop out of red twine for the turkey’s gobbler. Attach it to the pine cone with hot glue and you’re done!
#11 Turkey Treat Buckets
Supplies:
- Durable 3-inch Brown Metal Pails
- Assorted Turkey Feathers
- Adhesive Craft Foam
- Googly Eyes
- Tacky Glue or Low-Temp Glue Gun
Instructions:
- Start by running a line of Tacky Glue along the top outside edge of the bucket. Attach 4-6 feathers to the glue and allow it to dry. Older children can use a low-temperature glue gun for a quicker process.
- Next, glue two large googly eyes to the front of the bucket. Cut a beak and snood from adhesive craft foam.
- Fill the buckets with your favorite sweets and candies to make them extra special.
- To add a personalized touch, consider adding a name tag to create cute Thanksgiving place cards.
- These turkeys’ treat buckets also make for stunning table centerpieces. Guests can take them home as a delicious party favor at the end of the evening.
- Get ready to delight guests of all ages with these surefire-hit Thanksgiving turkey treat buckets!
#12 Pumpkin Turkey Craft
Materials:
- Small pumpkin
- Brown and yellow foam
- Red felt
- Fall leaves
- Googly eyes
- Glue gun and glue sticks
Instructions:
Step 1: Create the face and legs of the turkey by cutting them out of brown foamy.
Step 2: Add the finishing touches to the turkey’s face by attaching a yellow foamy beak, googly eyes, and a small red felt oval for the wattle.
Step 3: Allow everything to dry for a few minutes, then securely glue the head to the stem of the pumpkin.
Step 4: Position the turkey to face you and attach the feet to the front of the pumpkin using glue.
Step 5: Bring the turkey to life by gluing three to four leaves to the back of the pumpkin to create a tail. Alternate between red and yellow leaves for a realistic touch. After a few minutes of drying time, your Thanksgiving centerpiece is ready!
Mom Tip: Allow your kids to join in on the crafting fun by using safety round scissors to cut larger shapes, like the head and feet. To help younger children, use a pencil to outline where to cut. This will make them feel more involved in the process.
#13 Turkey Napkin Rings
Supplies:
- Brown Felt: Opt for 1 sheet to craft 4 napkin rings or hair clips, or obtain it by the yard.
- Various Colors and Sizes of Ribbon: Utilize around 7 pieces, each approximately 4 inches long.
- Small Flip Clip
- Hot Glue Gun and Glue
Instructions:
- Start by cutting two pieces for the napkin ring: one measuring 5 x 2 inches and the other measuring 1 x 2 inches.
- Apply a line of glue to both short ends of the smaller piece and attach it to the middle of the longer piece.
- Apply a line of glue to one of the short ends of the longer piece and attach it to the other end to form a ring. Make sure the smaller piece is on the outside of the ring, as this is how you’ll attach the turkey clip.
- Cut out a turkey body shape and a second round piece slightly smaller than the bottom circle of the turkey.
- Fold your ribbons in half with the right sides out, then glue the ends together to create the feathers.
- Apply a half circle of glue to the back of the round piece of felt and attach the feathers. Add more glue if needed, layering if necessary.
- Apply glue to the bottom round part of the front felt piece and place it over the ribbons.
- Seal the edges of a piece of rick rack by running it over a flame. Then, glue on the eyes and rick rack. (What’s that gobbly thing called again?)
- Finally, add some glue to the top of the hair clip and attach it to the back of the turkey.
#14 Tulle Thanksgiving Turkey Wreath Craft
Supplies:
- Foam wreath (choose the size that suits you, I opted for a small one)
- Outdoor acrylic paint in Maple Syrup, Lemon Custard yellow, and Licorice black
- Medium-sized Styrofoam ball for the turkey head (make sure to measure it next to the wreath to get the right size)
- Small Styrofoam cone for the turkey beak (again, measure it next to the Styrofoam ball)
- Two small Styrofoam balls for the eyes (measure them against other items for proper proportion)
- 1 red craft foam sheet
- Brown yarn
- 25 yards each of Red, Orange, Brown, and Yellow tulle
- Toothpicks
- Hot glue gun and hot glue
- 3 foam paint brushes
- Fabric scissors
- Length of cardboard
Instructions:
- First, paint the Styrofoam pieces. Paint the circle brown to create the head and paint the cone yellow for the beak.
- Next, add black circles to the small round balls to create the eyes.
- Measure out and cut the Tulle to the desired length. For best results, refer to the instructional video to learn a quick and easy trick. You’ll need 30 strips of yellow, orange, and brown tulle, as well as 35 strips of red tulle.
- Measure 1/3 of the wreath to determine the placement of the “chest.” Mark this section on the wreath.
- Using hot glue, secure the yarn in place starting on the measured portion of the wreath.
- Wrap the yarn tightly around the “chest” area of the wreath until it is completely covered. Trim any excess yarn and secure the end with hot glue.
- Arrange the tulle strips in your desired color pattern.
- Tie five strips of red tulle onto the wreath, then tie on five strips of the next color. Repeat this process until you have used up all of the tulles or have reached the other end of the yarn.
- Take the round ball that was painted brown and insert 1-2 toothpicks into the base. Apply a small amount of hot glue to the base near the toothpicks. Insert the toothpicks into the wreath in the center of the yarn section, ensuring the turkey head is securely attached.
- Cut a snood shape out of the red foam sheet. You can freehand the cutting.
- Apply hot glue to the tip of the back of the snood and attach it to the center of the turkey head.
- Insert a toothpick into the back of the turkey beak. Apply hot glue around the base of the toothpick. Insert the toothpick through the top of the snood and into the turkey head, ensuring the beak is securely attached.
- Attach the eyes to the toothpicks using hot glue.
- Finally, create a “hanger” using more tulle.
Conclusion
In conclusion, engaging and educational turkey crafts for kids provide a fantastic way to bond with your children while also teaching them about the wonders of art, creativity, and culture.
These craft ideas are designed to be fun, and simple enough for young ones to complete on their own or with some help from you if need be. From handprint turkeys to paper versions and beyond, there is something here that each kid can enjoy making and showing off to family and friends.
So gather up your supplies, don your creative hats, and put those little hands to work making these precious memories they will cherish forever. Don’t forget to take lots of pictures too!
The fun doesn’t have to stop here though – why not start a collection of holiday-themed kid crafts for all seasons? There’s no limit to how creative you can get; the sky is truly the limit. Let’s make this season extra special by having our children’s imaginations sparkle with turkey crafts!
Thanks for reading our article. If you want to know more information, visit our website here.
Read more: